SpecForge User Guide
SpecForge is an AI-powered formal specification authoring tool based on Lilo, a domain specific language designed for specifying temporal systems.
This guide covers installation, the Lilo specification language, the Python SDK, and using Lilo with VSCode.
To get started, see setting up, releases are available from the releases page.
Other versions of this guide:
- In PDF format.
- In Japanese. (このガイドには日本語版もあります.)
Setting up SpecForge
The SpecForge suite consists of a few components:
- The SpecForge Server which is the backend server which the other components connect to. It can be run via Docker or as an executable.
- The SpecForge VSCode Extension which provides Lilo Language support in VSCode for editing and managing specifications, as well as rendering interactive visualizations.
- The SpecForge Python SDK which provides an API for interacting with the SpecForge server from Python code. This can be used to communicate and exchange specifications or data with the SpecForge server from Python scripts or Jupyter notebooks.
All necessary files can be obtained from the SpecForge releases page.
Quick Start
Follow these steps to get started quickly:
- Install dependencies
z3andrsvg-converter(see OS-specific instructions;rsvg-converteris optional) - Download and extract the SpecForge executable for your operating system
- Configure your license (place
license.jsonin the appropriate location for your OS) - (Optional) Configure LLM provider by setting environment variables (e.g.,
LLM_PROVIDER=openai,OPENAI_API_KEY=...) - see LLM Provider Configuration - Start the SpecForge server:
./specforge serve(or.\specforge.exe serveon Windows) - Install the VSCode Extension (see docs)
- Create a directory for your project and place your
.lilofiles directly in it - Open the directory in VSCode and start writing specifications
Note: The lilo.toml project configuration file is optional. For initial setup, you can skip it and place your specification and data files directly in the project root. See Project Configuration for details on when and how to use lilo.toml.
Detailed Setup Instructions
Choose your platform for detailed setup instructions:
- Windows - Complete setup guide for Windows
- macOS - Complete setup guide for macOS (Apple Silicon)
- Linux - Complete setup guide for Linux
- Docker - Using Docker instead of the executable
Setting up SpecForge on Windows
This guide will walk you through setting up SpecForge on Windows.
1. Installation
MSI Installer (Recommended)
Download specforge-x.y.z-Windows-X64.msi from the SpecForge releases page and run the installer.
The MSI installer will:
- Install SpecForge to
C:\Program Files\Imiron\SpecForge\ - Add SpecForge to your system PATH automatically
- Include all required dependencies (Z3, rsvg-convert)
Standalone Executable
Download specforge-x.y.z-Windows-X64.zip from the SpecForge releases page and extract it to a directory of your choice.
Note: With this method, you need to manually install dependencies.
The SpecForge executable requires Z3 and rsvg-converter (optional) to be installed on your system.
Using Chocolatey (Recommended)
Open PowerShell as Administrator and run:
choco install z3 rsvg-convert
If you don't have Chocolatey, you can install it from chocolatey.org.
Manual Installation
If you prefer not to use a package manager, download Z3 directly from the Z3 releases page and add it to your PATH.
2. Configure Your License
The SpecForge server requires a valid license file to start. If you don't have a license, please contact the SpecForge team or request a trial license.
Place your license.json file in one of the following locations (the first match is used):
-
Standard Configuration Directory (recommended):
%APPDATA%\specforge\license.json- Typically:
C:\Users\YourUsername\AppData\Roaming\specforge\license.json
-
Environment Variable (for custom locations):
$env:SPECFORGE_LICENSE_FILE="C:\path\to\license.json" -
Current Directory:
.\license.json
Create the directory if it doesn't exist. You can do this in PowerShell:
New-Item -ItemType Directory -Force -Path "$env:APPDATA\specforge"
Copy-Item "C:\path\to\your\license.json" "$env:APPDATA\specforge\license.json"
3. Configure LLM Provider (Optional)
To use LLM-based features such as natural-language spec generation and error explanation, configure an LLM provider by setting environment variables before starting the server.
For OpenAI (recommended):
$env:LLM_PROVIDER="openai"
$env:LLM_MODEL="gpt-5-nano-2025-08-07"
$env:OPENAI_API_KEY="your-api-key-here"
Get an API key from platform.openai.com/api-keys.
For other providers (Gemini, Ollama), see the LLM Provider Configuration guide.
5. Start the Server
If you used the MSI installer, run from any directory:
specforge serve
If you used the standalone executable, navigate to the directory where you extracted the SpecForge executable and run:
.\specforge.exe serve
The server will start on http://localhost:8080. You can verify it's running by navigating to http://localhost:8080/health, which should show version information.
Note: The server will exit immediately if the license is missing or invalid. If you encounter startup issues, verify your license configuration.
6. Install the VSCode Extension
Install the SpecForge VSCode extension from the Visual Studio Marketplace or see the VSCode Extension setup guide.
Next Steps
- VSCode Extension - Learn about the VSCode extension features
- Python SDK - Set up the Python SDK for programmatic access
- A Whirlwind Tour - Take a tour of SpecForge capabilities
- Project Configuration - Learn about
lilo.tomlconfiguration
Setting up SpecForge on macOS
This guide will walk you through setting up SpecForge on macOS using the standalone executable.
1. Download the Executable
Download specforge-x.y.z-macOS-ARM64.tar.bz2 from the SpecForge releases page and extract it to a directory of your choice.
2. Install Dependencies
The SpecForge executable requires Z3 to be installed. Install it using Homebrew:
brew install z3
If you don't have Homebrew, install it from brew.sh.
3. Configure Your License
The SpecForge server requires a valid license file to start. If you don't have a license, please contact the SpecForge team or request a trial license.
Place your license.json file in one of the following locations (the first match is used):
-
Standard Configuration Directory (recommended):
~/.config/specforge/license.json
-
Environment Variable (for custom locations):
export SPECFORGE_LICENSE_FILE=/path/to/license.json -
Current Directory:
./license.json
Create the directory if it doesn't exist:
mkdir -p ~/.config/specforge
cp /path/to/your/license.json ~/.config/specforge/
4. Configure LLM Provider (Optional)
To use LLM-based features such as natural-language spec generation and error explanation, configure an LLM provider by setting environment variables before starting the server.
For OpenAI (recommended):
export LLM_PROVIDER=openai
export LLM_MODEL=gpt-5-nano-2025-08-07
export OPENAI_API_KEY=your-api-key-here
Get an API key from platform.openai.com/api-keys.
For other providers (Gemini, Ollama), see the LLM Provider Configuration guide.
5. Start the Server
Navigate to the directory where you extracted the SpecForge executable and run:
./specforge serve
The server will start on http://localhost:8080. You can verify it's running by navigating to http://localhost:8080/health, which should show version information.
Note: The server will exit immediately if the license is missing or invalid. If you encounter startup issues, verify your license configuration.
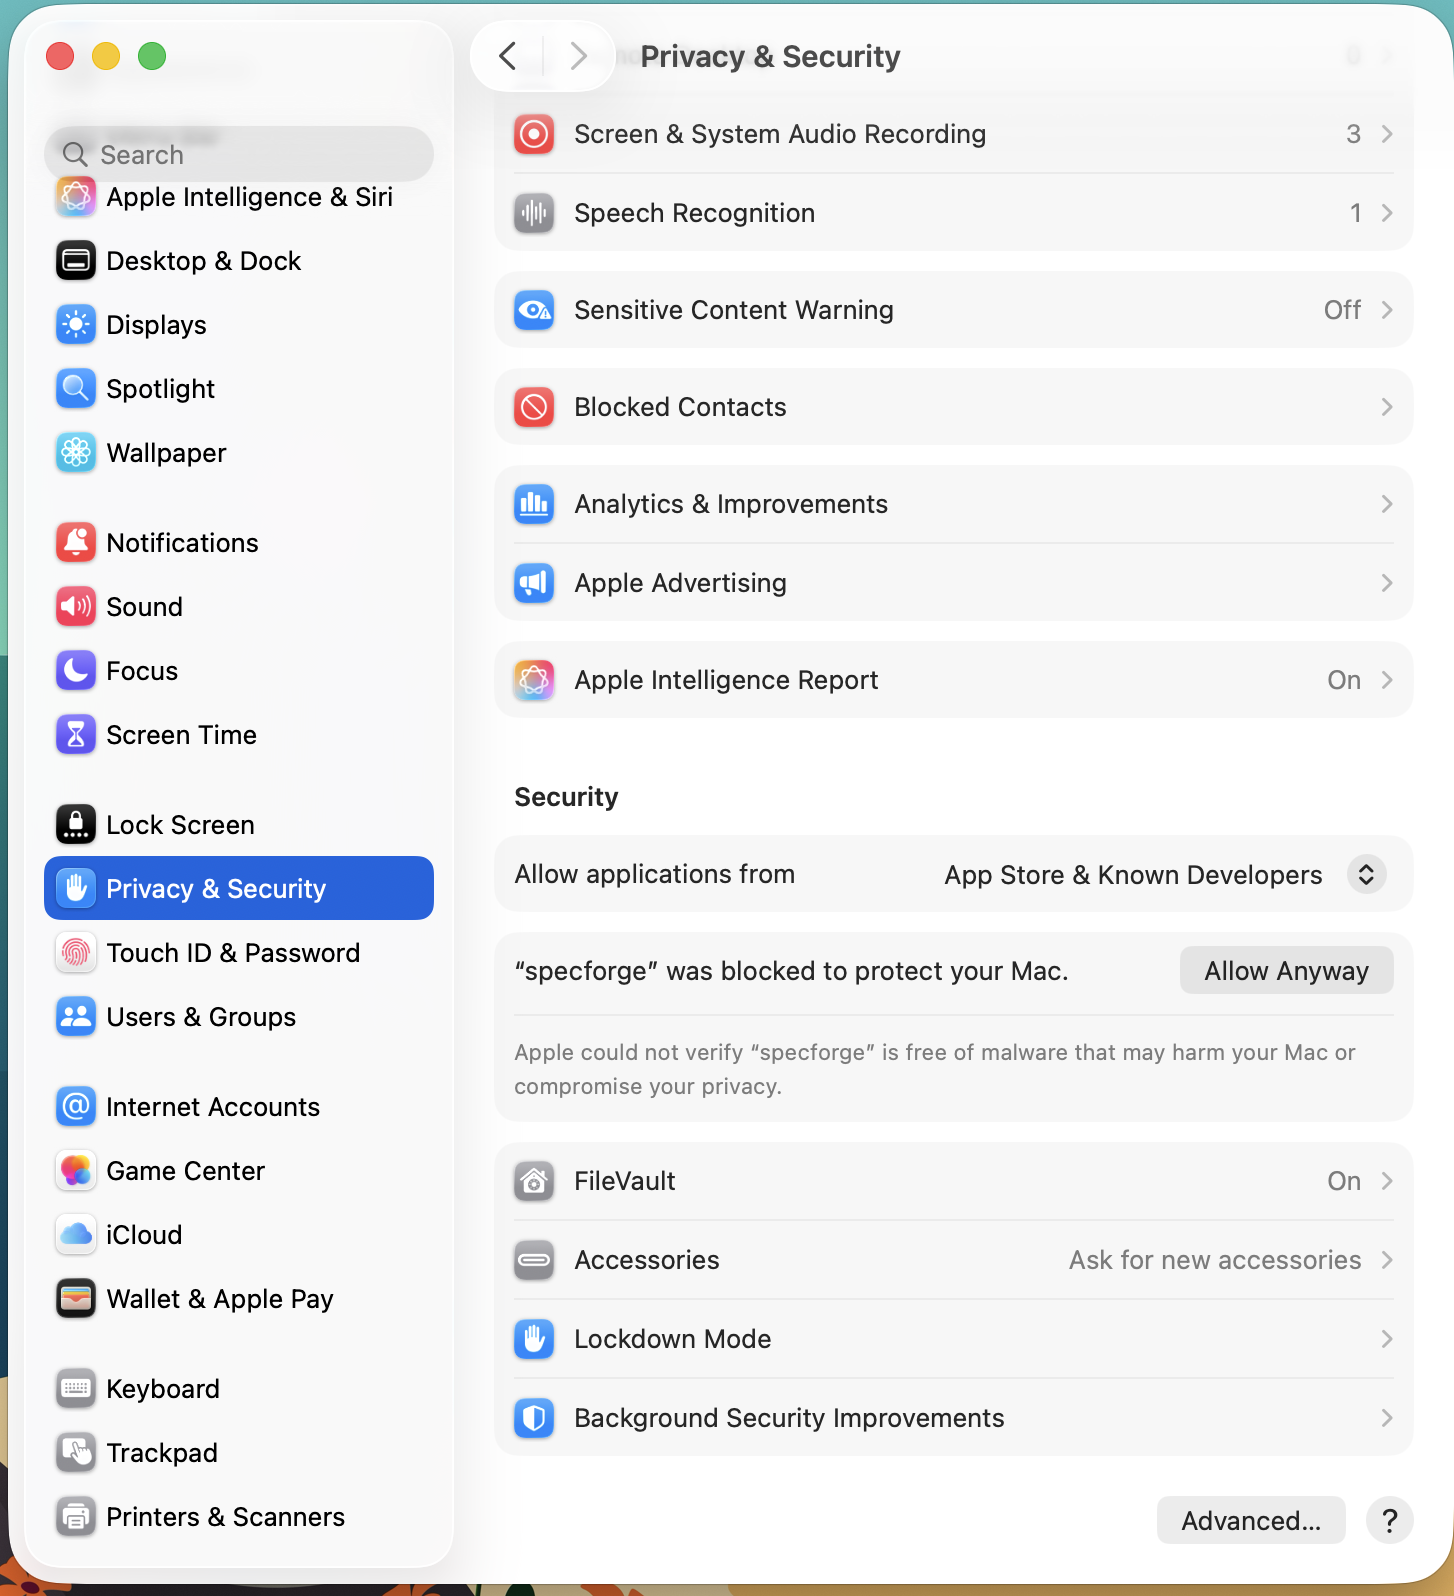
Allowing Execution of the Downloaded SpecForge Binary
The MacOS Gatekeeper may display an alert preventing you from executing the downloaded binary, because it was downloaded from a third-party source.

To whitelist the specforge executable, run the following command.
xattr -d com.apple.quarantine path/to/specforge
Alternatively, you can do so from the System Settings GUI by following these steps.
- Open System Settings, and go to 'Privacy & Security'
- In the security section, you should see '"specforge" was blocked to protect your Mac.'
- Click 'Open Anyway'.
6. Install the VSCode Extension
Install the SpecForge VSCode extension from the Visual Studio Marketplace or see the VSCode Extension setup guide.
Next Steps
- VSCode Extension - Learn about the VSCode extension features
- Python SDK - Set up the Python SDK for programmatic access
- A Whirlwind Tour - Take a tour of SpecForge capabilities
- Project Configuration - Learn about
lilo.tomlconfiguration
Setting up SpecForge on Linux
This guide will walk you through setting up SpecForge on Linux using the standalone executable.
1. Download the Executable
Download specforge-x.y.z-Linux-X64.tar.bz2 from the SpecForge releases page and extract it to a directory of your choice.
2. Install Dependencies
The SpecForge executable requires Z3 to be installed. Use your distribution's package manager:
Ubuntu/Debian:
sudo apt install z3
Fedora/RHEL:
sudo dnf install z3
Arch Linux:
sudo pacman -S z3
3. Configure Your License
The SpecForge server requires a valid license file to start. If you don't have a license, please contact the SpecForge team or request a trial license.
Place your license.json file in one of the following locations (the first match is used):
-
Standard Configuration Directory (recommended):
~/.config/specforge/license.json
-
Environment Variable (for custom locations):
export SPECFORGE_LICENSE_FILE=/path/to/license.json -
Current Directory:
./license.json
Create the directory if it doesn't exist:
mkdir -p ~/.config/specforge
cp /path/to/your/license.json ~/.config/specforge/
4. Configure LLM Provider (Optional)
To use LLM-based features such as natural-language spec generation and error explanation, configure an LLM provider by setting environment variables before starting the server.
For OpenAI (recommended):
export LLM_PROVIDER=openai
export LLM_MODEL=gpt-5-nano-2025-08-07
export OPENAI_API_KEY=your-api-key-here
Get an API key from platform.openai.com/api-keys.
For other providers (Gemini, Ollama), see the LLM Provider Configuration guide.
5. Start the Server
Navigate to the directory where you extracted the SpecForge executable and run:
./specforge serve
The server will start on http://localhost:8080. You can verify it's running by navigating to http://localhost:8080/health, which should show version information.
Note: The server will exit immediately if the license is missing or invalid. If you encounter startup issues, verify your license configuration.
6. Install the VSCode Extension
Install the SpecForge VSCode extension from the Visual Studio Marketplace or see the VSCode Extension setup guide.
Next Steps
- VSCode Extension - Learn about the VSCode extension features
- Python SDK - Set up the Python SDK for programmatic access
- A Whirlwind Tour - Take a tour of SpecForge capabilities
- Project Configuration - Learn about
lilo.tomlconfiguration
Setting up SpecForge with Docker
This guide will walk you through setting up SpecForge using Docker instead of the standalone executable.
Prerequisites
Before starting the server, you must obtain and configure a valid license. If you don't have a license, please contact the SpecForge team or request a trial license.
1. Obtain the Docker Compose File
The SpecForge Server is distributed as a Docker Image via GHCR (GitHub Container Registry). The recommended way to run the Docker Image is through Docker Compose.
Download the latest docker-compose-x.y.z.yml file from the SpecForge releases page.
2. Configure Your License
The SpecForge server requires a valid license file. You need to make the license file available to the Docker container.
-
Place your
license.jsonfile in a new directory. Using/home/user/.config/specforge/is a common practice. -
Modify the following lines in your
docker-compose-x.y.z.ymlfile to point to your license file:- type: bind source: path/to/.config/specforge/ # place your license.json file here on the host machine target: /app/specforgeconfig/ # config directory inside the container (do not modify this) read_only: trueNote: It is not recommended to run docker as
root(i.e. withsudo). But if you do, note that paths with~/would be understood by the system as/root/, not your home directory. So it's best to use absolute paths (without~).
3. Configure LLM Provider (Optional)
To use LLM-based features such as natural-language spec generation and error explanation, configure an LLM provider by modifying environment variables in your docker-compose.yml file before starting the server.
For OpenAI (recommended):
- LLM_PROVIDER=openai
- LLM_MODEL=gpt-5-nano-2025-08-07
- OPENAI_API_KEY=${OPENAI_API_KEY}
Get an API key from platform.openai.com/api-keys.
You can insert API keys directly in the file, but using environment variables is better for security.
For other providers (Gemini, Ollama) and detailed configuration options, see the LLM Provider Configuration guide.
4. Start the Server
Run the following command, replacing /path/to/docker-compose-x.y.z.yml with the actual path to your downloaded file:
docker compose -f /path/to/docker-compose-x.y.z.yml up --abort-on-container-exit
The flag
--abort-on-container-exitis recommended so that the container fails fast on startup errors.
You can verify that the server is up by navigating to http://localhost:8080/health, which should show version information.
Note: The server will exit immediately if the license is missing or invalid. If you encounter startup issues, verify your license configuration.
5. Install the VSCode Extension
Install the SpecForge VSCode extension from the Visual Studio Marketplace or see the VSCode Extension setup guide.
Updating the Docker Image
From time to time, new versions of the SpecForge Server are released. To use the latest version, you can either:
-
Use the updated docker-compose file from the releases page, or
-
Set the image field to latest in your Docker Compose file:
image: ghcr.io/imiron-io/specforge/specforge-backend:latestThen pull the latest image:
docker compose -f /path/to/docker-compose.yml pull
Next Steps
- VSCode Extension - Learn about the VSCode extension features
- Python SDK - Set up the Python SDK for programmatic access
- A Whirlwind Tour - Take a tour of SpecForge capabilities
- Project Configuration - Learn about
lilo.tomlconfiguration
LLM Provider Configuration
SpecForge includes LLM-based features such as natural-language based spec generation and error explanation. To use these features, you need to configure an LLM provider.
Supported Providers
SpecForge currently supports three LLM providers:
- OpenAI - Cloud-based API (recommended for most users)
- Gemini - Google's cloud-based API
- Ollama - Run models locally on your machine
Configuration Methods
For Executable (Windows, macOS, Linux)
Set the following environment variables before starting the SpecForge server:
OpenAI
# Linux / macOS
export LLM_PROVIDER=openai
export LLM_MODEL=gpt-5-nano-2025-08-07
export OPENAI_API_KEY=your-api-key-here
# Windows PowerShell
$env:LLM_PROVIDER="openai"
$env:LLM_MODEL="gpt-5-nano-2025-08-07"
$env:OPENAI_API_KEY="your-api-key-here"
Get an API key from platform.openai.com/api-keys.
Gemini
# Linux / macOS
export LLM_PROVIDER=gemini
export LLM_MODEL=gemini-2.5-flash
export GEMINI_API_KEY=your-api-key-here
# Windows PowerShell
$env:LLM_PROVIDER="gemini"
$env:LLM_MODEL="gemini-2.5-flash"
$env:GEMINI_API_KEY="your-api-key-here"
Get an API key from ai.google.dev/gemini-api/docs/api-key.
Ollama
First, install and run Ollama from docs.ollama.com/quickstart.
Then set the environment variables:
# Linux / macOS
export LLM_PROVIDER=ollama
export LLM_MODEL=your-model-name  # e.g., llama3.2, mistral
export OLLAMA_API_BASE=http://127.0.0.1:11434
# Windows PowerShell
$env:LLM_PROVIDER="ollama"
$env:LLM_MODEL="your-model-name"  # e.g., llama3.2, mistral
$env:OLLAMA_API_BASE="http://127.0.0.1:11434"
Change OLLAMA_API_BASE if your Ollama server is running on a different machine.
For Docker
Modify the environment variables in your docker-compose.yml file:
- LLM_PROVIDER=openai # other options: ollama, gemini
- LLM_MODEL=gpt-5-nano-2025-08-07 # choose the appropriate model for your provider
# One of the following, depending on LLM_PROVIDER:
- OPENAI_API_KEY=${OPENAI_API_KEY}
- GEMINI_API_KEY=${GEMINI_API_KEY}
- OLLAMA_API_BASE=http://127.0.0.1:11434 # change if your ollama server is running remotely
You can insert API keys directly in the file:
- LLM_PROVIDER=gemini
- GEMINI_API_KEY=abc123XYZ # no string quotes
However, it is better to use environment variables for security.
Default Models
If you don't set the LLM_MODEL variable:
- OpenAI: Defaults to
gpt-5-nano-2025-08-07 - Gemini: Defaults to
gemini-2.5-flash - Ollama: You must specify a model (no default)
Without LLM Configuration
Without an appropriate LLM provider configuration, LLM-based SpecForge features will be unavailable. The rest of SpecForge will continue to work normally.
VSCode Extension
The Lilo Language Extension for VSCode provides
- Syntax Highlighting, Typechecking and Autocompletion for
.lilofiles - Satisfiability and Redundancy checking for specifications
- Support for visualizing monitoring results in Python notebooks
Installation
The SpecForge VSCode extension can be installed in two ways:
From the VSCode Marketplace
Install the extension directly from the Visual Studio Marketplace or search for "SpecForge" in VSCode's extensions tab (Ctrl+Shift+X or Cmd+Shift+X).
From VSIX File
Alternatively, you can install from a VSIX file (included in releases):
- Open VSCode's extensions tab (Ctrl+Shift+X or Cmd+Shift+X), click on the three dots at the top right, and select
Install from VSIX... - Open VSCode's command palette (Ctrl+Shift+P or Cmd+Shift+P), type
Extensions: Install from VSIX..., and select the.vsixfile
Important: Ensure the extension version matches your SpecForge server version. Version mismatches may cause compatibility issues.
Usage and Configuration
- For the extension to work, the SpecForge server must be running (see Setting up SpecForge).
- The URI corresponding to the server can be configured if necessary using the extension settings. Do not add a trailing slash at the end of this URL.
Once the extension is installed and the server is running, it should automatically be working on .lilo files, and in relevant Python notebooks.
Setting up the Python SDK
The Python SDK is a python library which can be used to interact with SpecForge tools programmatically from within Python programs, including notebooks.
The Python SDK is packaged as a wheel file with the name specforge_sdk-x.x.x-py3-none-any.whl.
Refer to the SpecForge Python SDK guide for an overview of the SDK features and capabilities.
A Sample Walkthrough
The Python SDK can be installed directly using pip, or defined as a dependency via a build envionment such as poetry or uv.
We discuss below how such an environment can be setup using uv. If you prefer to use a different build system, the workflow should be similar.
-
Install
uvon your operating system. See the uv installation guide for more details. -
Create a new project directory and navigate into it. Populate it with a
pyproject.tomlfile. -
Declare the dependencies in the
pyproject.tomlfile.- The wheel file for the Python SDK can be declared as a local dependency. Ensure that a correct path to the wheel file is provided.
- Features of SpecForge, such as the interactive monitor, can be used as a part of Python Notebooks. To do so, you may want to include
jupyterlabas a dependency as well. - Libraries such as
numpy,pandasandmatplotlibare frequently included for data processing and visualization. - Here is an example
pyproject.tomlfile:
[project] name = "sample-project" version = "0.1.0" description = "Sample Project for Testing SpecForge SDK" authors = [{ name = "Imiron Developers", email = "info@imiron.io" }] readme = "README.md" requires-python = ">=3.12" dependencies = [ "jupyterlab>=4.4.5", "pandas>=2.3.1", "matplotlib>=3.10.3", "numpy>=2.3.2", "specforge-sdk", ] [tool.uv.sources] specforge_sdk = { path = "lib/specforge_sdk-0.5.5-py3-none-any.whl" } -
Run
uv sync. This should create a.venvdirectory which would have the appropriate dependencies (including the correct version of python) installed. -
Run
source .venv/bin/activateto use the Shell Hook with access topython. You can confirm that this has been configured correctly as follows.$ source .venv/bin/activate (falsification-examples) $ which python /path/to/project/falsification/.venv/bin/python -
Now, you can browse the example notebooks. Make sure that your notebook is connected to the kernel in the
.venv. This is usually configured automatically, but can also be done manually. To do so, runjupyter serverand copy and paste the server URL in the kernel settings in the VSCode notebook viewer.
Project Configuration
Lilo projects can use an optional lilo.toml configuration file at the project root.
For getting started, you can skip this configuration entirely and simply place your .lilo specification files and data files directly in the root of your project. SpecForge will work with sensible defaults.
When you do use lilo.toml, if the file or any of its fields are missing, sensible defaults apply. The Python SDK and the VS Code extension read this file and apply the semantics accordingly.
The configuration file is useful for:
- Setting a project name and custom source path (default: project root or
src/) - Customizing language behavior (interval mode, freeze)
- Adjusting diagnostics settings (consistency, redundancy, optimize, unused defs) and their timeouts
- Registering
system_falsifierentries for falsification analysis
Below are the schema and defaults, followed by a complete example.
Schema and defaults
Top-level keys and their defaults when omitted:
-
projectname(string).- Default:
"". - On init: set to the provided name; otherwise to the name of the project root directory.
- Default:
source(path string). Default:"src/"
-
languageinterval.mode(string). Supported:"static". Default:"static"freeze.enabled(bool). Default:true
-
diagnosticsconsistency.enabled(bool). Default:trueconsistency.timeouts.named(seconds, float). Default:0.5consistency.timeouts.system(seconds, float). Default:1.0redundancy.enabled(bool). Default:trueredundancy.timeouts.named(seconds, float). Default:0.5redundancy.timeouts.system(seconds, float). Default:1.0optimize.enabled(bool). Default:trueunused_defs.enabled(bool). Default:true
-
[[system_falsifier]](array of tables, optional)- Each entry:
name(string),system(string),script(string) - If absent or empty, the key is omitted from the file and treated as an empty list
- Each entry:
Default file:
[project]
name = ""
source = "src/"
Example lilo.toml
An example project with overrides.
[project]
name = "my-specs"
source = "src/"

[language]
freeze.enabled = true
interval.mode = "static"

[diagnostics.consistency]
enabled = true

[diagnostics.consistency.timeouts]
named = 5.0
system = 10.0

[diagnostics.optimize]
enabled = true

[diagnostics.redundancy]
enabled = false

[diagnostics.unused_defs]
enabled = false

[[system_falsifier]]
name = "Psitaliro ClimateControl Falsifier"
system = "climate_control"
script = "falsifiers/falsify_climate_control.py"

[[system_falsifier]]
name = "Psitaliro ALKS falisifier"
system = "lane_keeping"
script = "falsifiers/alks.py"
A Whirlwind Tour
This section is a quick introduction to SpecForge's main capabilities through a hands-on example. We'll explore how to write specifications in the Lilo language and analyze them using SpecForge's VSCode extension.
The Lilo Language: A Brief Introduction
Lilo is an expression-based temporal specification language designed for hybrid systems. Here are the key concepts:
Primitive Types: Bool, Int, Float, and String
Operators: Standard arithmetic (+, -, *, /), comparisons (==, <, >, etc.), and logical operators (&&, ||, =>)
Temporal Operators: Lilo's distinguishing feature is its rich set of temporal logic operators:
always φ:φis true at all future timeseventually φ:φis true at some future timepast φ:φwas true at some past timehistorically φ:φwas true at all past times
These operators can be qualified with time intervals, e.g., eventually[0, 10] φ means φ becomes true within 10 time units. More operators are available.
Systems: Lilo specifications are organized into systems that group together:
signals: Time-varying input values (e.g.,signal temperature: Float)params: Non-temporal parameters that are not time-varying (e.g.,param max_temp: Float)types: Custom types for structured datadefinitions: Reusable definitions and helper functionsspecifications: Requirements that should hold for the system
A system file begins with a system declaration like system temperature_control and contains all the declarations for that system.
For a comprehensive guide to the language, see the Lilo Language chapter.
Running Example
We'll use a temperature control system as our running example. This example project is available in the releases. The system monitors temperature and humidity sensors, with specifications ensuring values remain within safe ranges:
system temperature_sensor

// Temperature Monitoring specifications
// This spec defines safety requirements for a temperature sensor system

import util use { in_bounds }

signal temperature: Float
signal humidity: Float

param min_temperature: Float
param max_temperature: Float

#[disable(redundancy)]
spec temperature_in_bounds = in_bounds(temperature, min_temperature, max_temperature)

spec always_in_bounds = always temperature_in_bounds

// Humidity should be reasonable when temperature is in normal range
spec humidity_correlation = always (
  (temperature >= 15.0 && temperature <= 35.0) =>
  (humidity >= 20.0 && humidity <= 80.0)
)

// Emergency condition - temperature exceeds critical thresholds
spec emergency_condition = temperature < 5.0 || temperature > 45.0

// Recovery specification - after emergency, system should stabilize
spec recovery_spec = always (
  emergency_condition =>
  eventually[0, 10] (temperature >= 15.0 && temperature <= 35.0)
)
The VSCode extension provides support for writing Lilo code, syntax highlighting, type-checking, warnings, spec satisfiability, etc.:
Spec Analysis
Once you've written specifications for your system, the SpecForge VSCode extension provides various analysis capabilities:
- Monitor: Check whether recorded system behavior satisfies specifications
- Exemplify: Generate example traces that satisfy specifications
- Falsify: Search for counterexamples that violate specifications, relative to some model
- Export: Convert specifications to other formats (
.json,.lilo, etc.) - Animate: Visualize specification behavior over time
This can be done directly from within VSCode, or from within in a Jupyter notebook using the Python SDK. We will perform analyses directly in VSCode here. The VSCode guide details all features in greater depth.
Monitoring
Monitoring checks whether actual system behavior, recorded in a data file, satisfies your specifications. You provide recorded trace data, and SpecForge evaluates a specification against it.
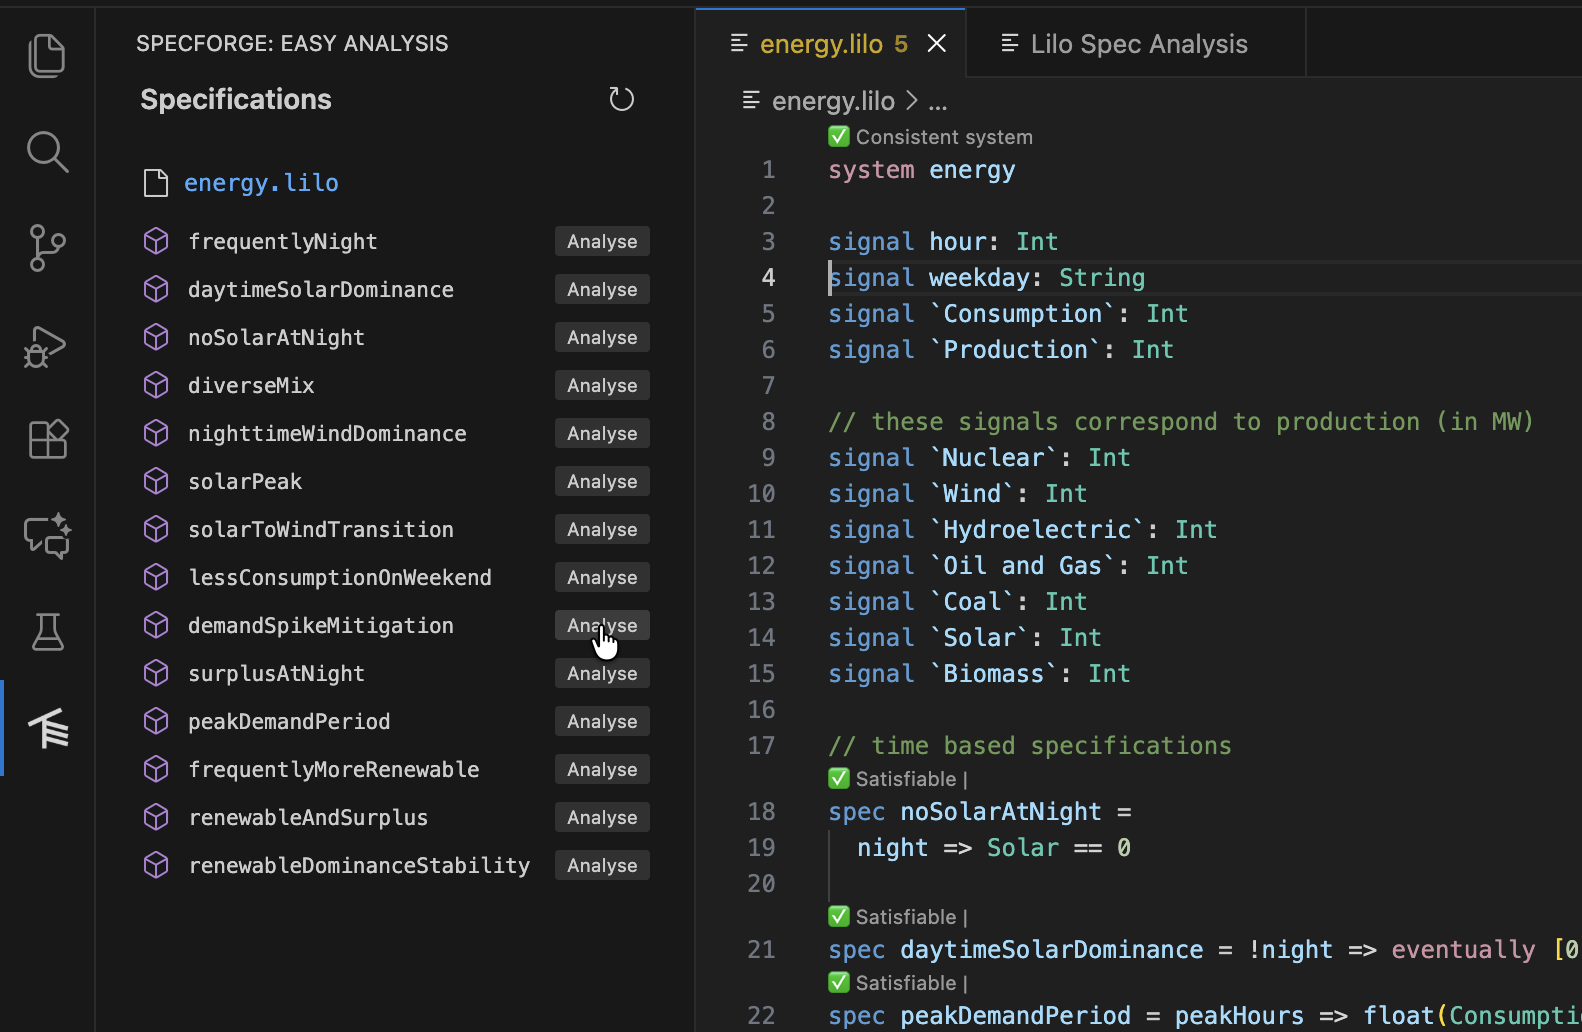
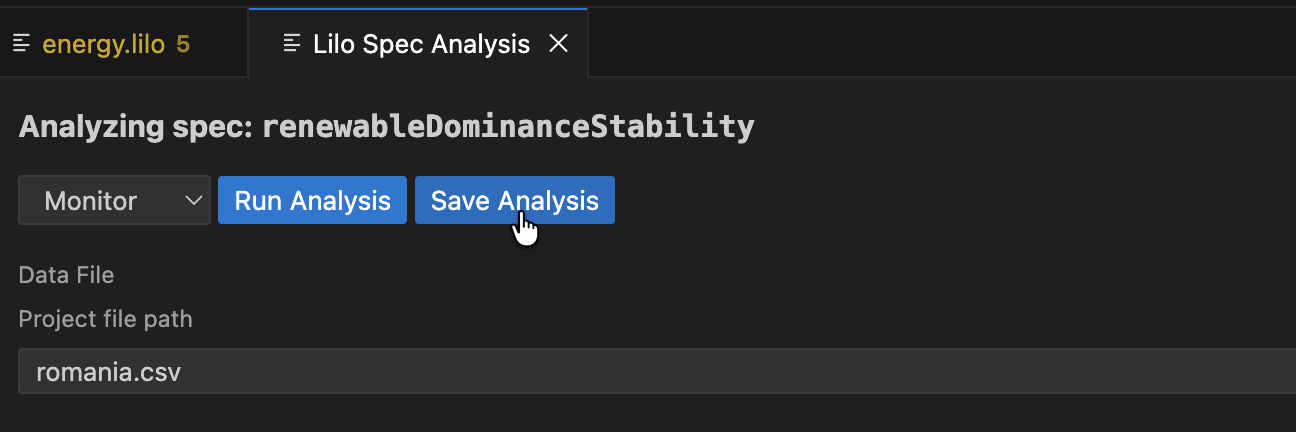
Navigate to the spec selection screen, and click the Analyse button for the spec you want to monitor.
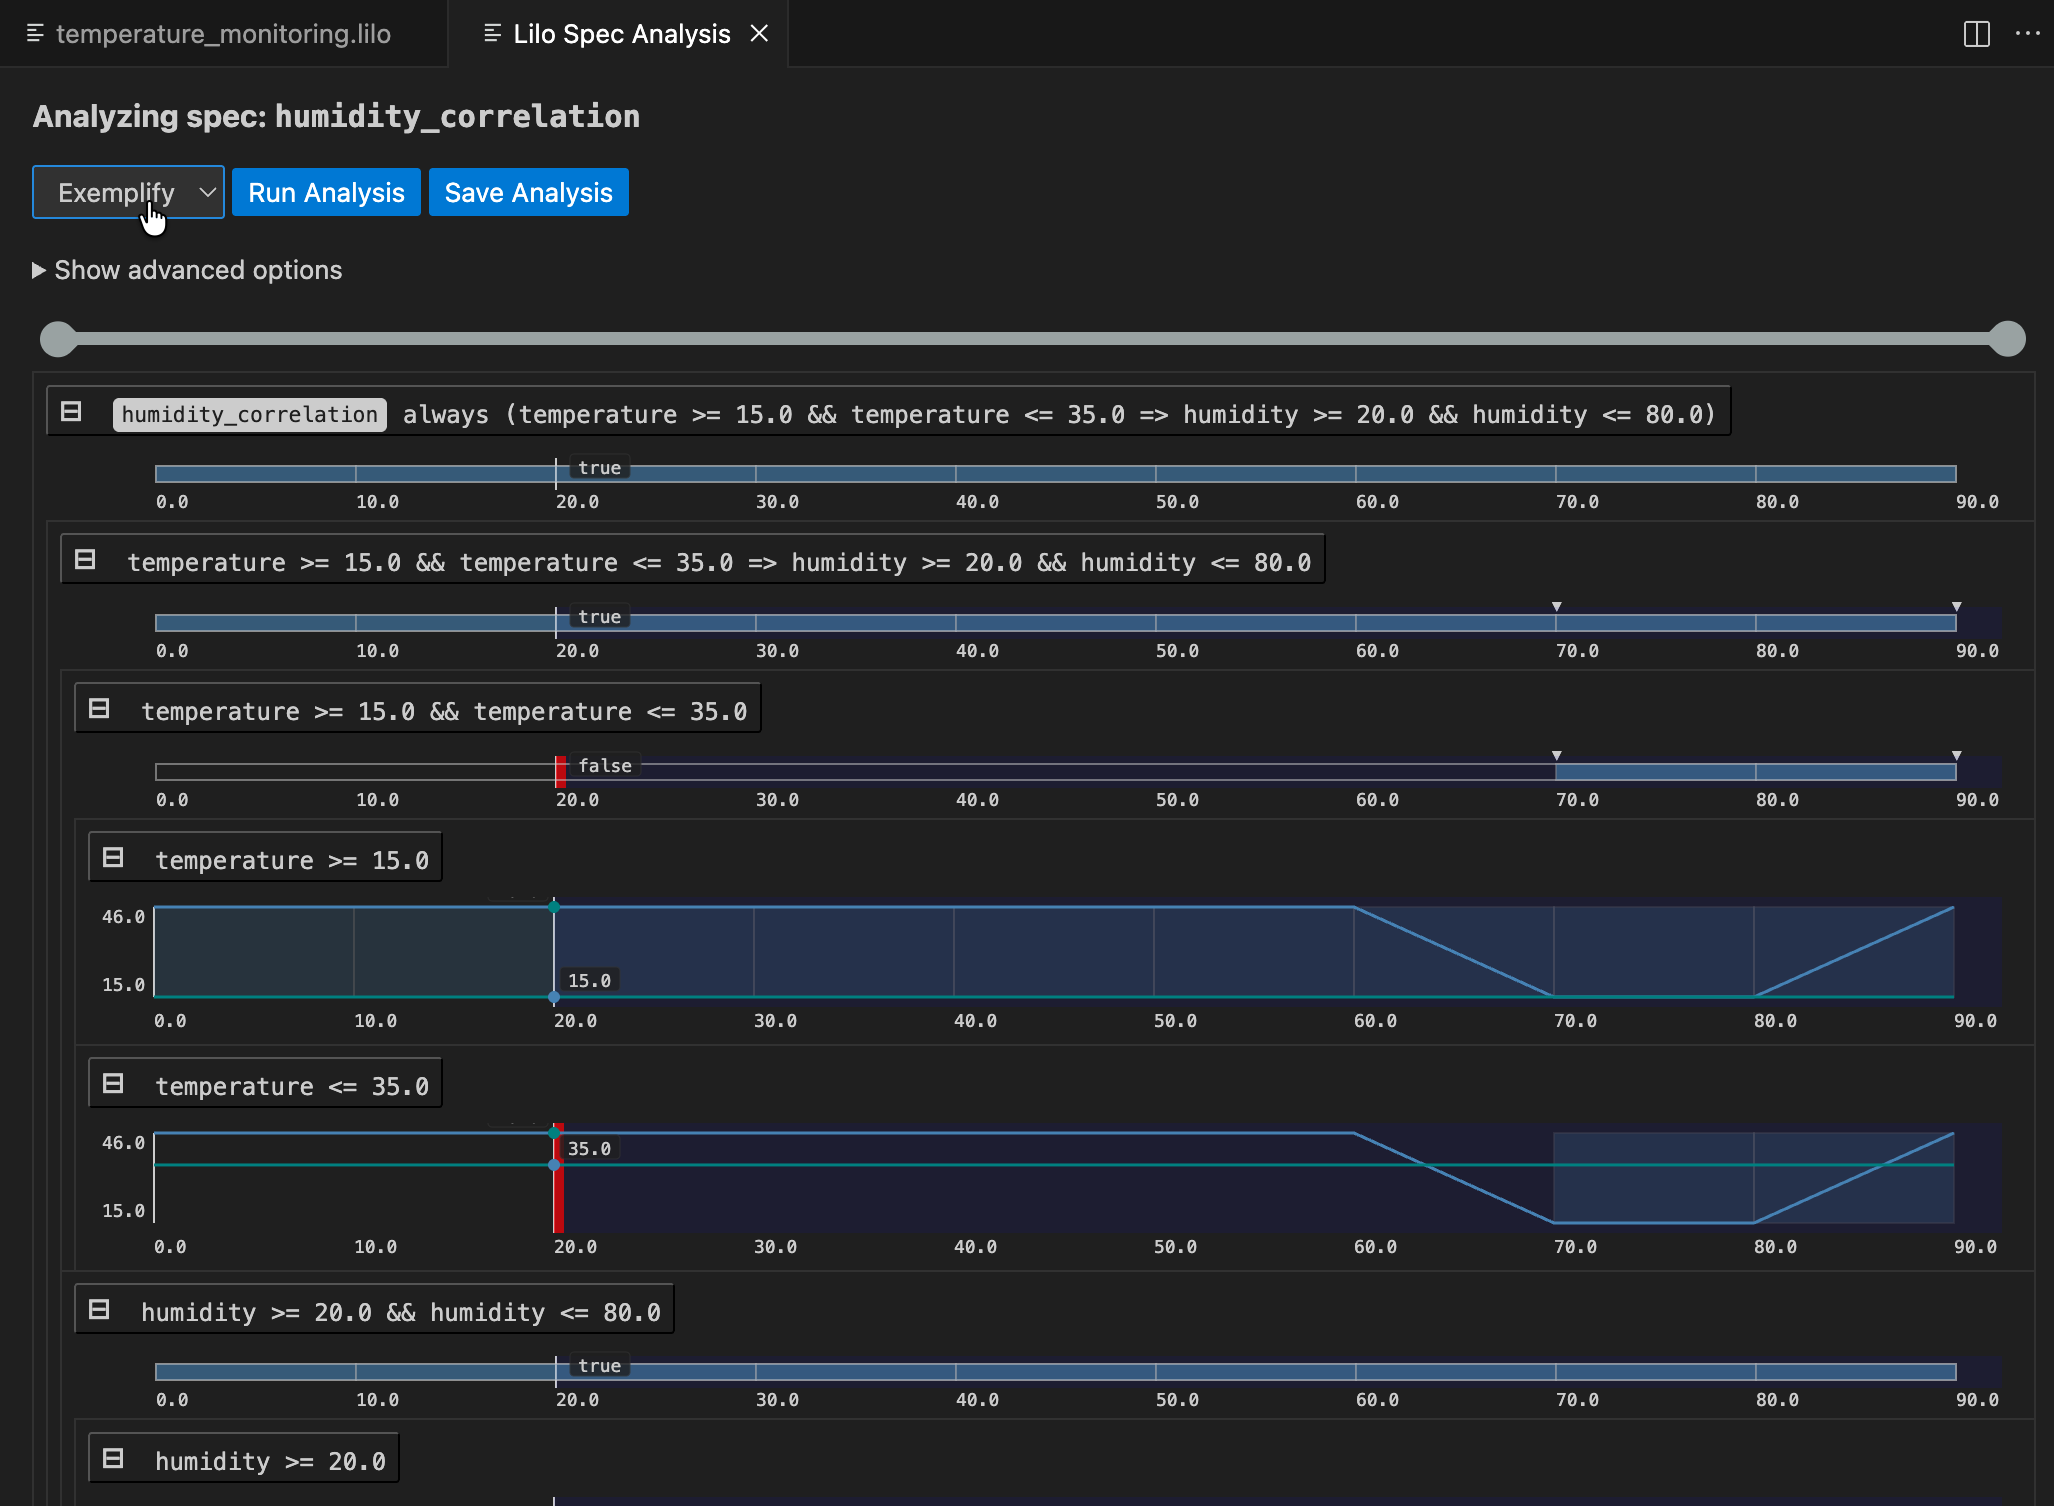
After selecting a data file from the dropdown menu, click Run Analysis. The result is an analysis monitoring tree for the specification:
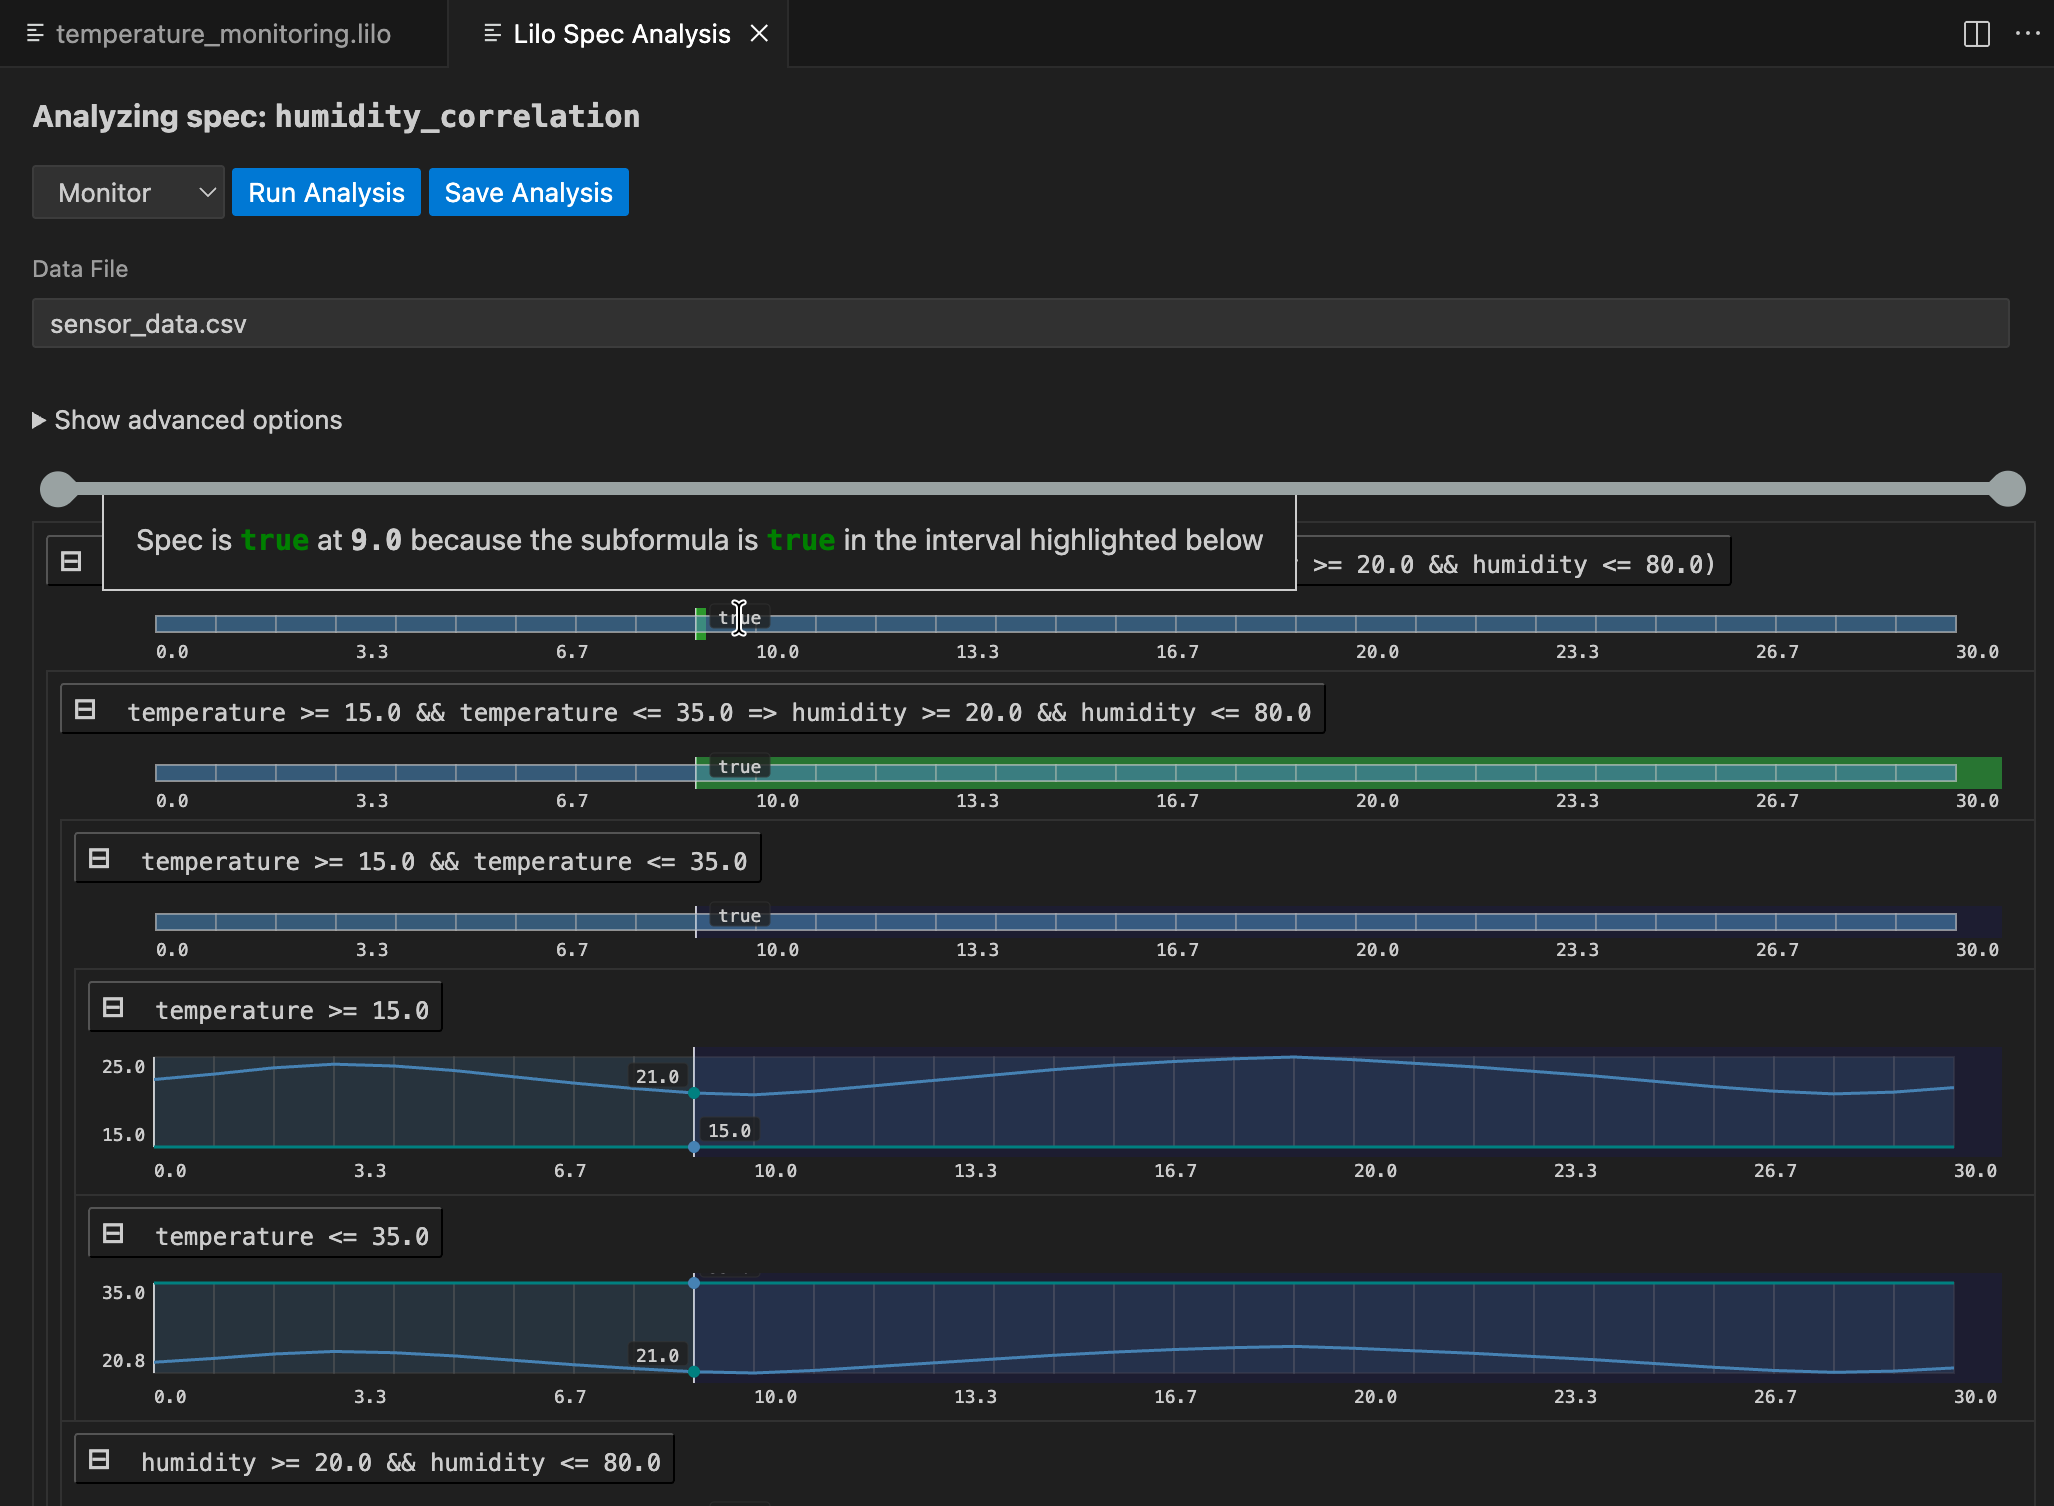
The result for the whole specification is shown at the top. Below this, you can drill down into sub-expressions of the specification, to understand what makes the spec true or false at any given time. Hovering over any of the signals will show a popup with an explanation of the result at that point in time, and will highlight relevant segments of sub-expression result signals.
An analysis can be saved. To do so, click the Save Analysis button, and choose a location to save the analysis. You can then navigate to this analysis file and open it again in VSCode. The analysis will also show up in the specification status menu, under the relevant spec.

Exemplification
The Exemplify analysis generates example traces that demonstrate satisfying behavior. This is useful for:
- Understanding what valid system behavior looks like
- Testing other components with realistic data
- Creating animations
If the exemplified data does not behave as expected, the specification might be wrong and need to be corrected. Exemplification can thus be used as an aid when authoring specifications.
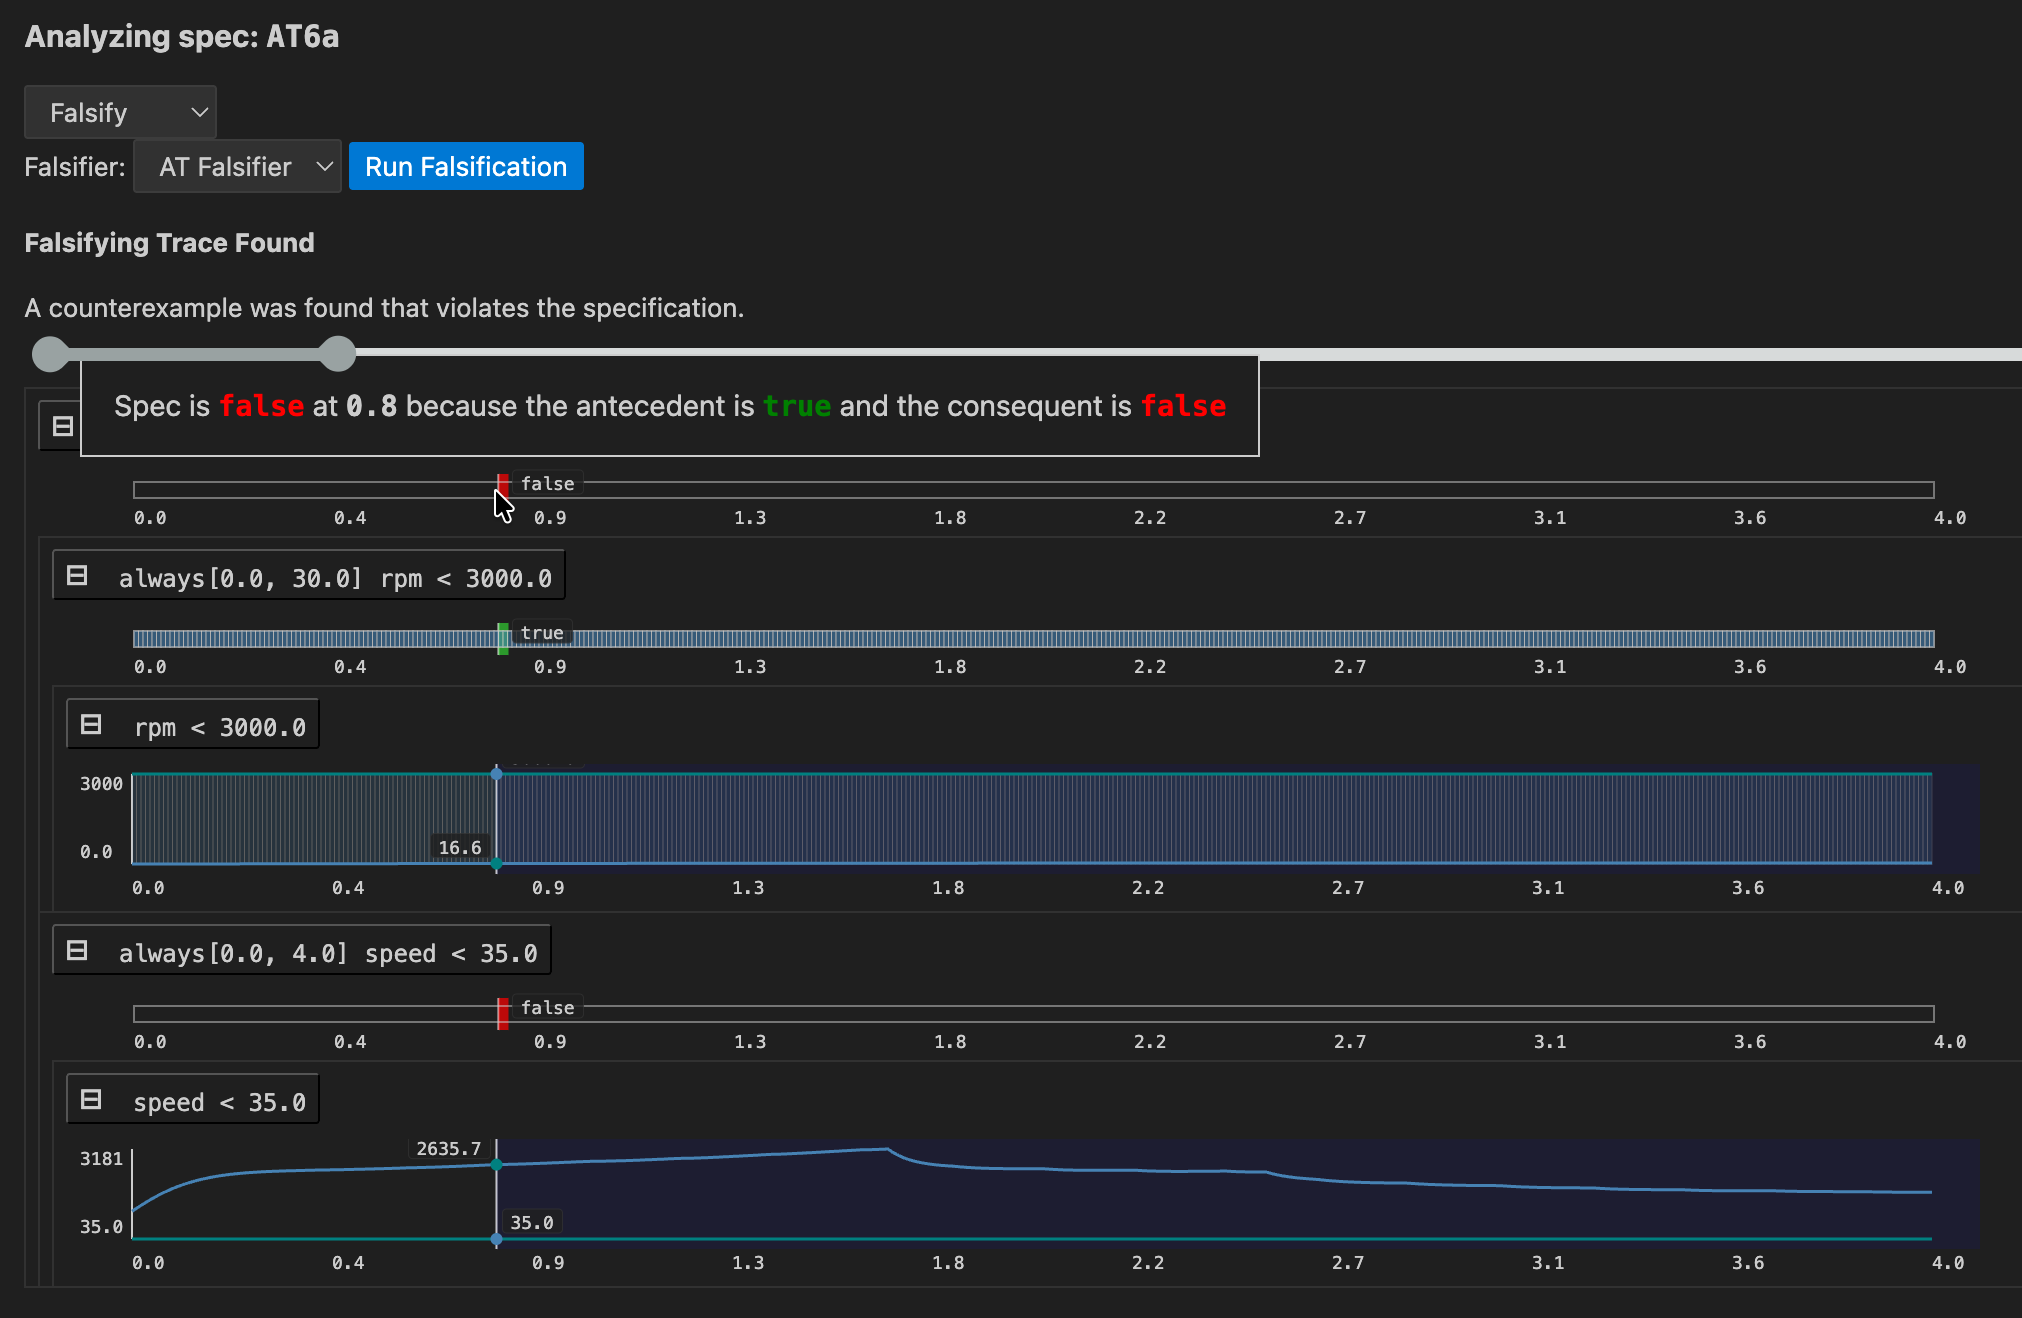
Falsification
If a model for the system is available, falsification can be used to see if the model behaves as expected, that is, according to specification.
First a falsifier must be registered in lilo.toml, e.g.
name = "automatic-transmission"
source = "spec"

[[system_falsifier]]
name = "AT Falsifier"
system = "transmission"
script = "transmission.py"
Once this is done, the falsifier will show up in the Falsify analysis menu. If a falsifying signal is found, the monitoring tree is show, to help understand how the model went wrong:
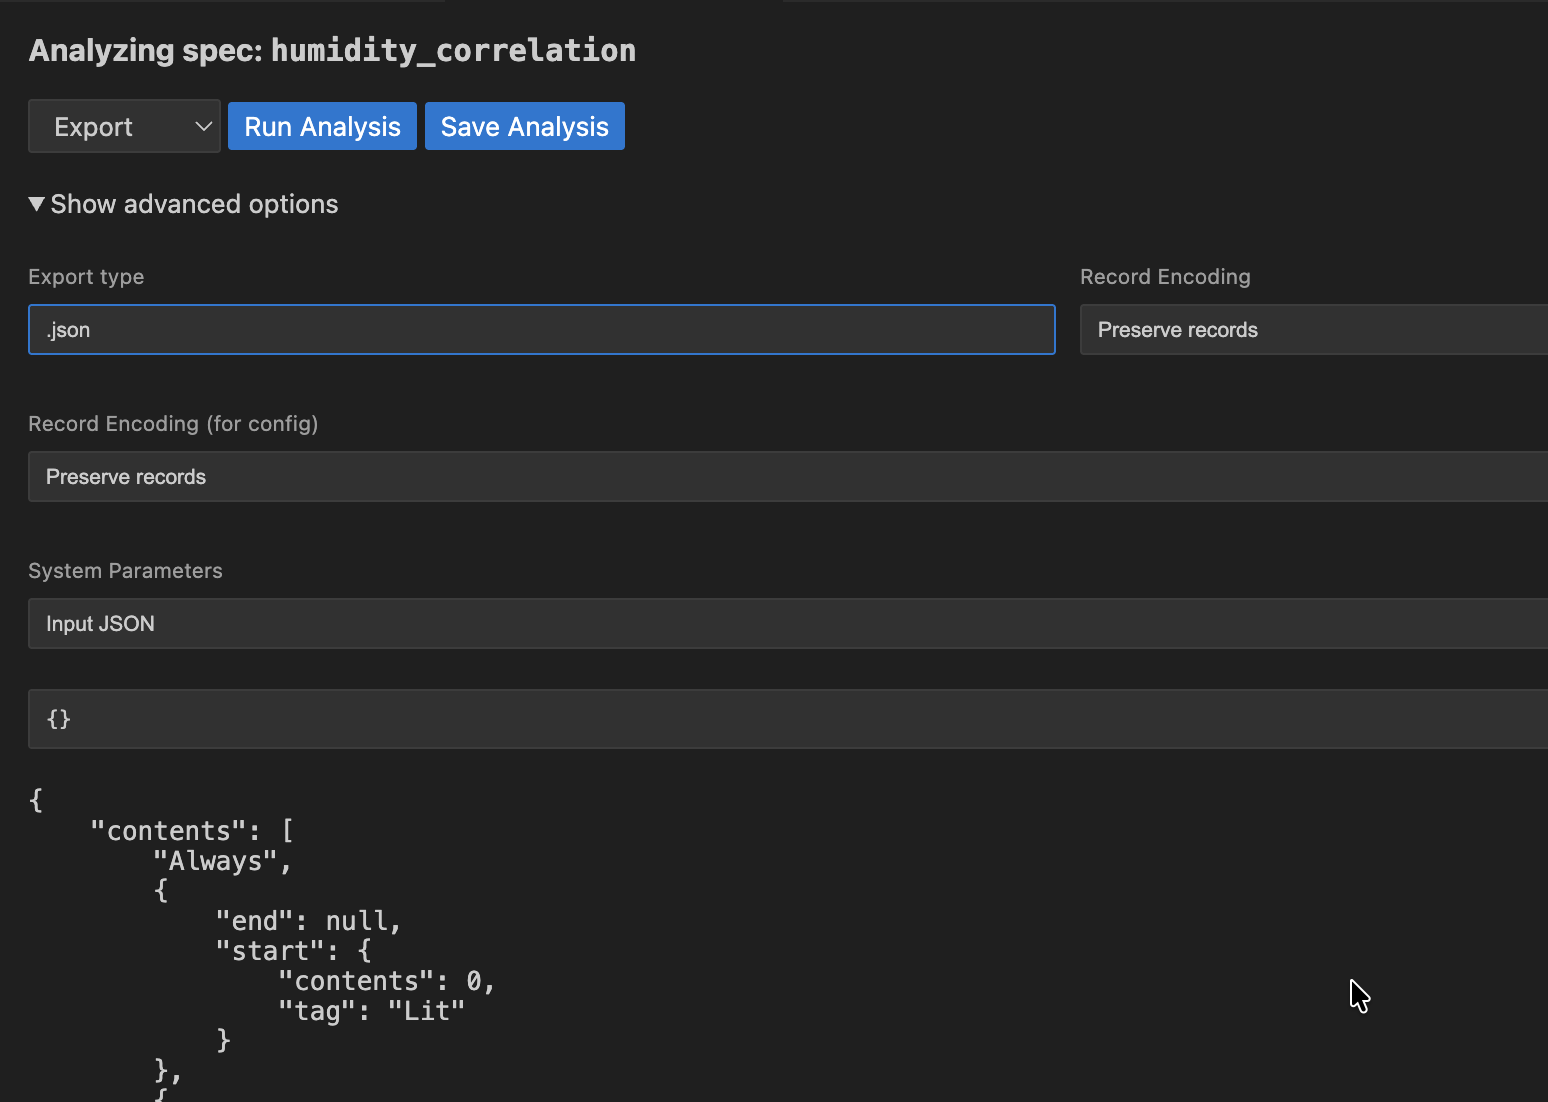
Export
Export converts your specifications to other formats, to be used in other tools. For example, if you want to export your specification to JSON format, choose .json as the Export type.
Next Steps
This tour covered the basics of what SpecForge can do. The following chapters dive deeper into:
- The full Lilo language (Lilo Language)
- System definitions and composition (Systems)
- The Python SDK for programmatic access (Python SDK)
Lilo Language
Lilo is a formal specification language designed for describing, verifying and monitoring the behavior of complex, time-dependent systems.
Lilo allows you to:
- Write expressions using a familiar syntax with powerful temporal operators for defining properties over time.
- Define data structures using records to model your system's data.
- Structure your specifications using systems.
Types and Expressions
Lilo is an expression-based language. This means that most constructs, from simple arithmetic to complex temporal properties, are expressions that evaluate to a time-series value. This section details the fundamental building blocks of Lilo expressions.
Comments
Comment blocks start with /* and end with */. Everything between these markers is ignored.
A line comment start with //, and indicates that the rest of the line is a comment.
Docstrings start with /// instead of //, and attach documentation to various language elements.
Primitive types
Lilo is a typed language. The primitive types are:
Bool: Boolean values. These are writtentrueandfalse.Int: Integer values, e.g.42.FloatFloating point values, e.g.42.3.String: Text strings, written between double-quotes, e.g."hello world".
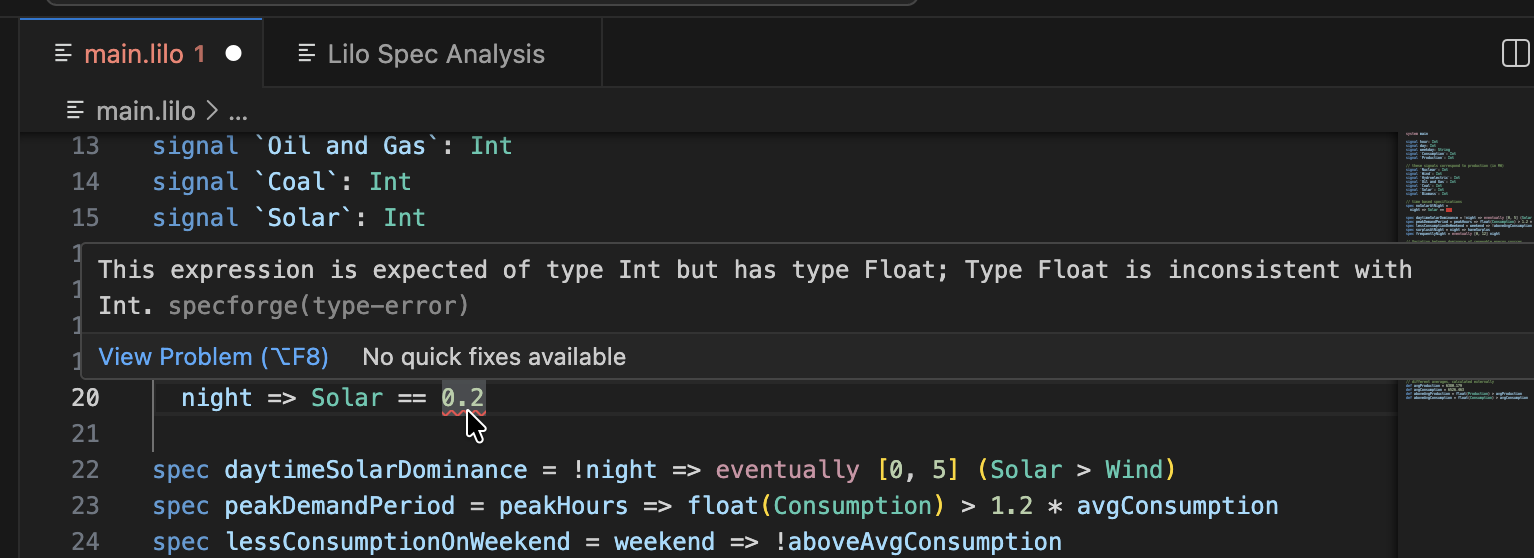
Type errors are signaled to the user like this:
def x: Float = 1.02

def n: Int = 42

def example = x + n
The code blocks in this documentation page can be edited, for example try changing the type of n to Float to fix the type error.
Operators
Lilo uses the following operators, listed in order of precedence (from highest to lowest).
-
Prefix negation:
-xis the additive inverse ofx, and!xis the negation ofx. -
Multiplication and division:
x * y,x / y. -
Addition and subtraction:
x + yandx - y. -
Numeric comparisons:
==: equality!=: non-equality>=: greater than or equals<=: less than or equals>: greater than (strict)<: less than (strict) Comparisons can be chained, in a consistent direction. E.g.0 < x <= 10means the same thing as0 < x && x <= 10.
-
Temporal operators
always φ:φis true at all times in the future.eventually φ:φis true at some point in the future.past φ:φwas true at some time in the past.historically φ:φwas true at all times in the past.will_change φ:φchanges value at some point in the future.did_change φ:φchanged value at some point in the past.φ since ψ:φis true at all points in the past, from some point whereψwas true.φ until ψ:φis true at all points in the future untilψbecomes true.next φ:φis true at the next (discrete) time point.previous φ:φis true at the previous (discrete) time point.
Temporal operators can be qualified with intervals:
always [a, b] φ:φis true at all times betweenaandbtime units in the future.eventually [a, b] φ:φis true at some point betweenaandbtime units in the future.φ until [a, b] ψ:φis true at all points between now and some point betweenaandbtime units in the future untilψbecomes true.- Similar interval qualifications apply to other temporal operators.
- One can use
infinityin intervals:[0, infinity].
-
Conjunction:
x && y, bothxandyare true. -
Disjunction:
x || y, one ofxoryis true. -
Implication and equivalence:
x => y: ifxis true, thenymust also be true.x <=> y:xis true if and onlyyis true.
Note that prefix operators cannot be chained. So one must write -(-x), or !(next φ).
Built-in functions
There are built-in functions:
-
floatwill produce aFloatfrom anInt:def n: Int = 42 def x: Float = float(n) -
timewill return the current time of the signal.
Conditional Expressions
Conditional expressions allow a specification to evaluate to different values based on a boolean condition. They use the if-then-else syntax.
if x > 0 then "positive" else "non-positive"
A key feature of Lilo is that if/then/else is an expression, not a statement. This means it always evaluates to a value, and thus the else branch is mandatory.
The expression in the if clause must evaluate to a Bool. The then and else branches must produce values of a compatible type. For example, if the then branch evaluates to an Int, the else branch must also evaluate to an Int.
Conditionals can be used anywhere an expression is expected, and can be nested to handle more complex logic.
// Avoid division by zero
def safe_ratio(numerator: Float, denominator: Float): Float =
  if denominator != 0.0 then
    numerator / denominator
  else
    0.0 // Return a default value

// Nested conditional
def describe_temp(temp: Float): String =
  if temp > 30.0
    then "hot"
  else if temp < 10.0
    then "cold"
  else
    "moderate"
Note that if _ then _ else _ is pointwise, meaning that the condition applies to all points in time, independently.
Records
Records are composite data types that group together named values, called fields. They are essential for modeling structured data within your specifications.
The Lilo language supports anonymous, structurally typed, extensible records.
Construction and Type
You can construct a record value by providing a comma-separated list of field = value pairs enclosed in curly braces. The type of the record is inferred from the field names and the types of their corresponding values.
For example, the following expression creates a record with two fields: foo of type Int and bar of type String.
{ foo = 42, bar = "hello" }
The resulting value has the structural type { foo: Int, bar: String }. The order of fields in a constructor does not matter.
You can also declare a named record type using a type declaration, which is highly recommended for clarity and reuse.
/// Represents a point in a 2D coordinate system.
type Point = { x: Float, y: Float }

// Construct a value of type Point
def origin: Point = { x = 0.0, y = 0.0 }
Field punning
When you already have a name in scope that should be copied into a record, you can pun the field by omitting the explicit assignment. A pun such as { foo } is shorthand for { foo = foo }.
def foo: Int = 42
def bar: String = "hello"

def record_with_puns = { foo, bar }
Punning works anywhere record fields are listed, including in record literals and updates. Each pun expands to a regular field = value pair during typechecking.
Path field construction
Nested records can be created or extended in one step by assigning to a dotted path. Each segment before the final field refers to an enclosing record, and the compiler will merge the pieces together.
type Engine = { status: { throttle: Int, fault: Bool } }

def default_engine: Engine =
  { status.throttle = 0, status.fault = false }
The order of path assignments does not matter; the paths are merged into the final record. A dotted path cannot be combined with punning; write { status.throttle = throttle } instead of { status.throttle } when you need the path form.
Record updates with with
Use { base with fields } to copy an existing record and override specific fields. Updates respect the same syntax rules as record construction: you can mix regular assignments, puns, and dotted paths.
type Engine = { status: { throttle: Int, fault: Bool } }

def base: Engine =
  { status.throttle = 0, status.fault = false }

def warmed_up: Engine =
  { base with status.throttle = 70 }

def acknowledged: Engine =
  { warmed_up with status.fault = false }
All updated fields must already exist in the base record. Path updates let you rewrite deeply nested pieces without rebuilding the entire structure.
Projection
To access the value of a field within a record, you use the dot (.) syntax. If p is a record that has a field named x, then p.x is the expression that accesses this value.
type Point = { x: Float, y: Float }

def is_on_x_axis(p: Point): Bool =
  p.y == 0.0
Records can be nested, and projection can be chained.
type Point = { x: Float, y: Float }
type Circle = { center: Point, radius: Float }

def is_unit_circle_at_origin(c: Circle): Bool =
  c.center.x == 0.0 && c.center.y == 0.0 && c.radius == 1.0
Local Bindings
Local bindings allow you to assign a name to an expression, which can then be used in a subsequent expression. This is accomplished using the let keyword and is invaluable for improving the clarity, structure, and efficiency of your specifications.
A local binding takes the form let name = expression1; expression2. This binds the result of expression1 to name. The binding name is only visible within expression2, which is the scope of the binding.
The primary purposes of let bindings are:
- Readability: Breaking down a complex expression into smaller, named parts makes the logic easier to follow.
- Re-use: If a sub-expression is used multiple times, binding it to a name avoids repetition and potential re-computation.
Consider the following formula for calculating the area of a triangle's circumcircle from its side lengths a, b, and c:
def circumcircle(a: Float, b: Float, c: Float): Float =
  (a * b * c) / sqrt((a + b +c) * (b + c - a) * (c + a - b) * (a + b - c))
Using let bindings makes the logic much clearer:
def circumcircle(a: Float, b: Float, c: Float): Float =
  let pi = 3.14;
  let s = (a + b + c) / 2.0;
  let area = sqrt(s * (s - a) * (s - b) * (s - c));
  let circumradius = (a * b * c) / (4.0 * area);
  circumradius * circumradius * pi
The type of the bound variable (s, area, circumradius) is automatically inferred from the expression it is assigned. You can also chain multiple let bindings to build up a computation step-by-step.
Systems
Ultimately Lilo is used to specify systems. A system groups together declarations for the temporal input signals, the (non-temporal) parameters and the specifications. A system also includes auxiliary definitions.
A system file should start with a system declaration, e.g.:
system Engine
The name of the system should match the file name.
Type declarations
A new type is declared with the type keyword. To define a new record type Point:
type Point = { x: Float, y: Float }
We can then use Point as a type anywhere else in the file.
Signals
The time varying values of the system are called signals. They are declared with the signal keyword. E.g.:
signal x: Float
signal y: Float
signal speed: Float
signal rain_sensor: Bool
signal wipers_on: Bool
The definitions and specifications of a system can freely refer to the system's signals.
A signal can be of any type that does not contain function types, i.e. a combination of primitive types and records.
System Parameters
Variables of a system which are constant over time are called system parameters. They are declared with the param keyword. E.g.:
param temp_threshold: Float
param max_errors: Int
The definitions and specifications of a system can freely refer to the system's parameters. Note that system parameters must be provided upfront before monitoring can begin. For exemplification, system parameters are optional. That is, they can be provided, in which case the example must conform to them, or otherwise the exemplification process will try to find values that work.
Definitions
A definition is declared with the def keyword:
def foo: Int = 42
A definition can depend on parameters:
def foo(x: Float) = x + 42
One can also specify the return type of a definition:
def foo(x: Float): Float = x + 42
The type annotations on parameters and the return type are both optional, if they are not provided they are inferred. It is recommended to always specify these types as a form of documentation.
The parameters of a definition can also be be record types, for instance:
type S = { x: Float, y: Float }

def foo(s: S) = eventually [0,1] s.x > s.y
Definitions can be used in other definitions, e.g.:
type S = { x: Float, y: Float }

def more_x_than_y(s: S) = s.x > s.y

def foo(s: S) = eventually [0,1] more_x_than_y(s)
Definitions can be specified in any order, as long as this doesn't create any circular dependencies.
Definitions can freely use any of the signals of the system, without having to declare them as parameters.
Specifications
A spec says something that should be true of the system. They can use all the signals and defs of the system. They are declared using the spec keyword. They are much like defs except:
- The return type is always
Bool(and doesn't need to be specified) - They cannot have parameters.
Example:
signal speed: Float

def above_min = 0 <= speed

def below_max = speed <= 100

spec valid_speed =
  always (above_min && below_max)
Modules
Lilo language supports modules. A module starts with a module declaration, and contains definitions (much like a system):
module Util

def add(x: Float, y: Float) = x + y

pub def calc(x: Float) = add(x, x)
The name of the module must match the file name. For example, a module declared as module Util must be defined in a file named Util.lilo.
A module can only contain defs and types.
Those definitions which should be accessible from other modules should be parked as pub, which means "public".
To use a module, one needs to import it, e.g. import Util. The public definitions from Util are then available to be used, with qualified names, e.g.:
import Util

def foo(x: Float) = Util::calc(x) + 42
One can import a module qualified with an alias, for example:
import Util as U

def foo(x: Float) = U::calc(x) + 42
To use symbols without a qualifier, use the use keyword:
import Util use { calc }

def foo(x: Float) = calc(x) + 42
Static Analysis
System code goes though some code quality checks.
Consistency Checking
Specs are checked for consistency. A warning is produced if specs may be unsatisfiable:
signal x: Float

spec main = always (x > 0 && x < 0)
This means that the specification is problematic, because it is impossible that any system satisfies this specification.
Inconsistencies between specs are also reported to the user:
signal x: Float

spec always_positive = always (x > 0)
spec always_negative = always (x < 0)
In this case each of the specs are satisfiable on their own, but taken together they cannot be satisfied by any system.
Redundancy Checking
If one spec is redundant, because implied by other specs of the system, this is also detected:
signal x: Float

spec positive_becomes_negative = always (x > 0 => eventually x < 0)

spec sometimes_positive = eventually x > 0

spec sometimes_negative = eventually x < 0
In this case we warn the user that the spec sometimes_negative is redundant, because this property is already implied by the combination of positive_becomes_negative and sometimes_positive. Indeed sometimes_positive implies that there is some point in time where x > 0, and using positivie_becomes_negative we conclude that therefore there must be some point in time after than when x < 0.
Additional Features
Attributes
In addition to docstrings (which begin with ///), Lilo definitions, specs, params and signals can be annotated with attributes. They must immediately precede the item they annotate.
The attributes are used to convey metadata about items they annotate which is used by the tooling (notably the VSCode extension).
#[key = "value", fn(arg), flag]
spec foo = true
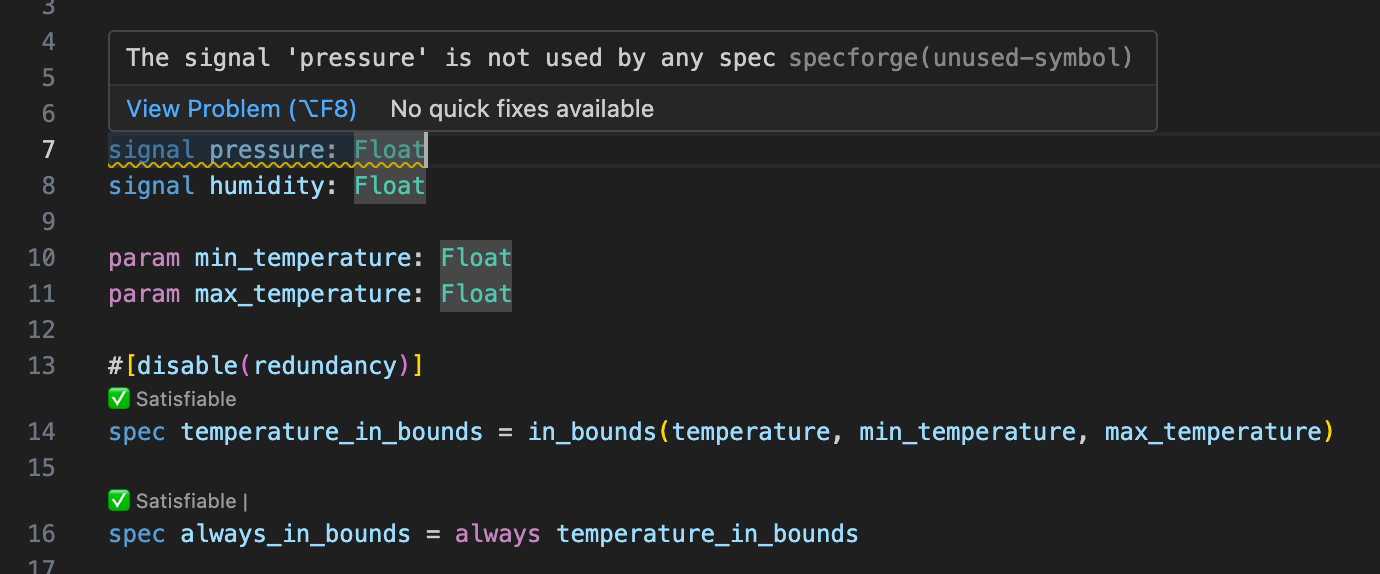
- Suppressing unused variable warnings:
#[disable(unused)]- Using this attribute on a definition, param or signal will suppress warnings about it being unused.
- Specs or public definitions are always considered used.
- Timeout for Static Analyses
- To override the default timeout for static analyses, a
timeoutcan be specified in seconds. - They can be specified individually
#[timeout(satisfiability = 20, redundancy = 30)] - Or together
#[timeout(10)]which sets both to 10 seconds.
- To override the default timeout for static analyses, a
- Disabling static analyses
- Use
#[disable(satisfiability)]or#[disable(redundancy)]to disable specific static analyses on a definition.
- Use
Default Values for Parameters
When specifying a system, parameters can optionally be given a default value. The intent of such a default value is to indicate that the parameter is expected to be instantiated with the default value in a typical use case.
param temperature: Float = 25.0
Default values should not be used to declare constants. For them, use a def instead.
def pi: Float = 3.14159
- When monitoring, parameters with default values can be omitted from the input. If omitted, the default value is used. They can also be explicitly provided, in which case the provided value is used.
- When exporting a formula, parameters with a default value will be substituted with the default value before the export.
- When exemplifying, the exemplifier will require the solver to fix the parameter to the default value.
When running an analysis such as export or exemplification, one can provide the JSON null value for a field in the config. This has the effect of requesting SpecForge to ignore the default value for the parameter.
system main

signal p: Int
param bound: Int = 1

spec foo = p > 1 && p < bound
- Exemplification
- With
params = {}: Unsatisfiable (the default value ofboundis used) - With
params = { "bound": null }: Satisfiable (the solver is free to choose a value ofboundthat satisfies the constraints)
- With
- Export
- With
params = {}, result:p > 1 && p < 1 - With
params = { "bound": 100 }, result:p > 1 && p < 100 - With
params = { "bound": null }, result:p > 1 && p < bound
- With
Note that the JSON null value cannot be used as a default value as a part of the Lilo program.
Spec Stubs
The user may create a spec stub, a spec without a body. Such a stub may still have a docstring and attributes. This can be used as a placeholder, and is interpreted as true by the Lilo tooling.
The VSCode extension will display a codelens to generate an implementation for the stub based on the docstring using an LLM (if configured).
/// The system should always eventually recover from errors.
spec error_recovery
Conventions
Some languages require that certain classes of names be capitalized or not, to distinguish them. Lilo is flexible, so that it can match the naming conventions of the system it is being used to specify. That said, here are the conventions that we use in the examples:
- Module and systems are lowercase snake_case. So e.g.
climate_controlrather thanClimateControl. - Important: The name of a module or system must match the file name it is defined in. For example,
module climate_controlorsystem climate_controlmust be defined in a file namedclimate_control.lilo. - Names of
signals,params,defs,specs, arguments and record field names are lowercase and snake_case. So e.g.signal wind_speedrather thansignal WindSpeedorsignal windSpeed. - Types, including user defined ones, should be capitalized and CamelCase. E.g.
type Plane = {
  wind_speed: Float,
  ground_speed: Float
}
VSCode Extension
The SpecForge VSCode extension provides a comprehensive development environment for writing and analyzing Lilo specifications. It combines language support, interactive analysis tools, and visualization capabilities in a unified interface.
See the VSCode extension installation guide to get setup.
Overview
The extension provides:
- Language Support: Syntax highlighting, type-checking, and autocompletion via a Language Server Protocol (LSP) implementation
- Diagnostics: Real-time checking for type errors, unused definitions, and optimization suggestions
- Code Lenses: Interactive analysis tools embedded directly in your code
- Spec Status Pane: A dedicated sidebar for navigating specifications and saved analyses
- Spec Analysis Pane: Interactive GUI for spec monitoring, exemplification, falsification, etc.
- Notebook Integration: Support for visualizing SpecForge results in Jupyter notebooks
- LLM Features: AI-powered spec generation and diagnostic explanations
Configuration
The extension requires the SpecForge server to be running. Configure the server connection in VSCode settings:
-
API Base URL: The URI for the SpecForge server (default:
http://localhost:8080)- Access via
Settings → Extensions → SpecForge → Api Base Url - Or use the setting ID:
specforge.apiBaseUrl
- Access via
-
Enable Preview Features: Enable experimental features including the Spec Status sidebar
- Access via
Settings → Extensions → SpecForge → Enable Preview Features - Or use the setting ID:
specforge.enablePreviewFeatures
- Access via
Language Features
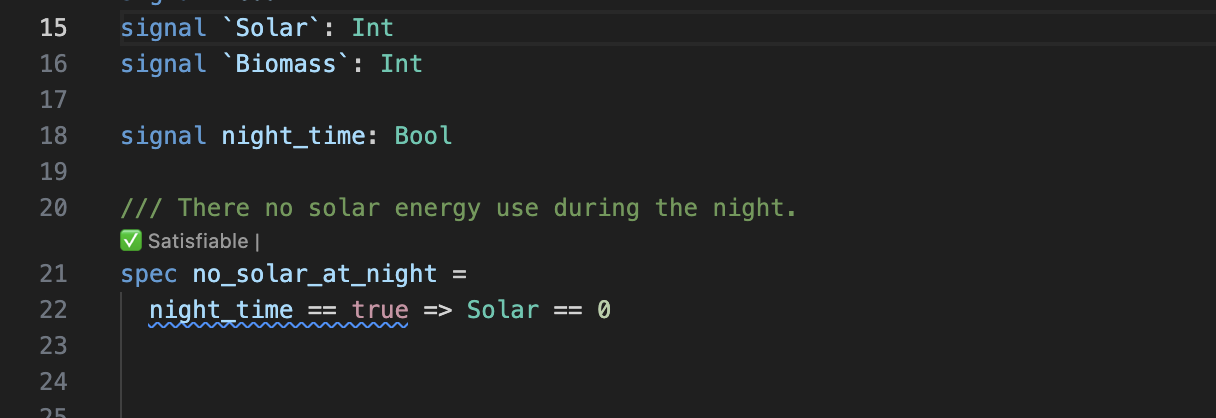
Parsing and Type Checking
The extension performs real-time checking as you write specifications. Errors will be underlined. Hovering over the affected code will show the error:
The extension will check for syntax errors, type errors, etc.
Document Outline
The extension provides a hierarchical outline of your specification file:
- Open the "Outline" view in VSCode's Explorer sidebar
- See all specs, definitions, signals, and parameters at a glance
- Click any symbol to jump to its definition
- The outline updates automatically
Diagnostics
The extension performs various checks automatically and provides feedback.
Hovering over a diagnostic will reveal the message.
Diagnostics include:
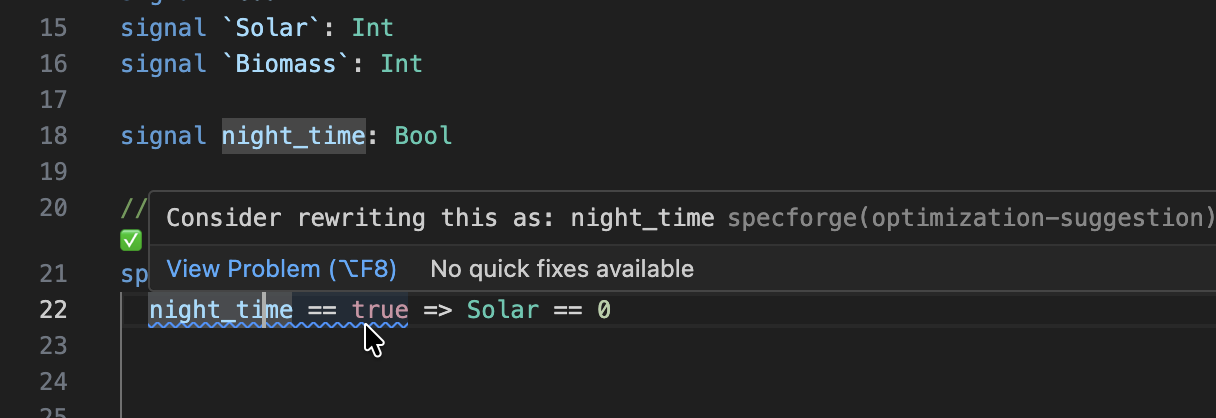
- Warnings for unused
signals,params,defs, etc. - Optimization suggestions.
- Warnings about using time-dependent expression in intervals (if so configured).
Code Lenses
Code lenses are interactive buttons that appear above specifications in your code, offering information and possibly actions.
Satisfiability Checking
Above each specification, you'll see a code lens indicating whether the spec is satisfiable:

Here is a spec that SpecForge has detected might be unsatisfiable:

The user can ask for an explanation:
If SpecForge could not decide the satisfiability, it is possible to relaunch the analysis with a longer timeout.
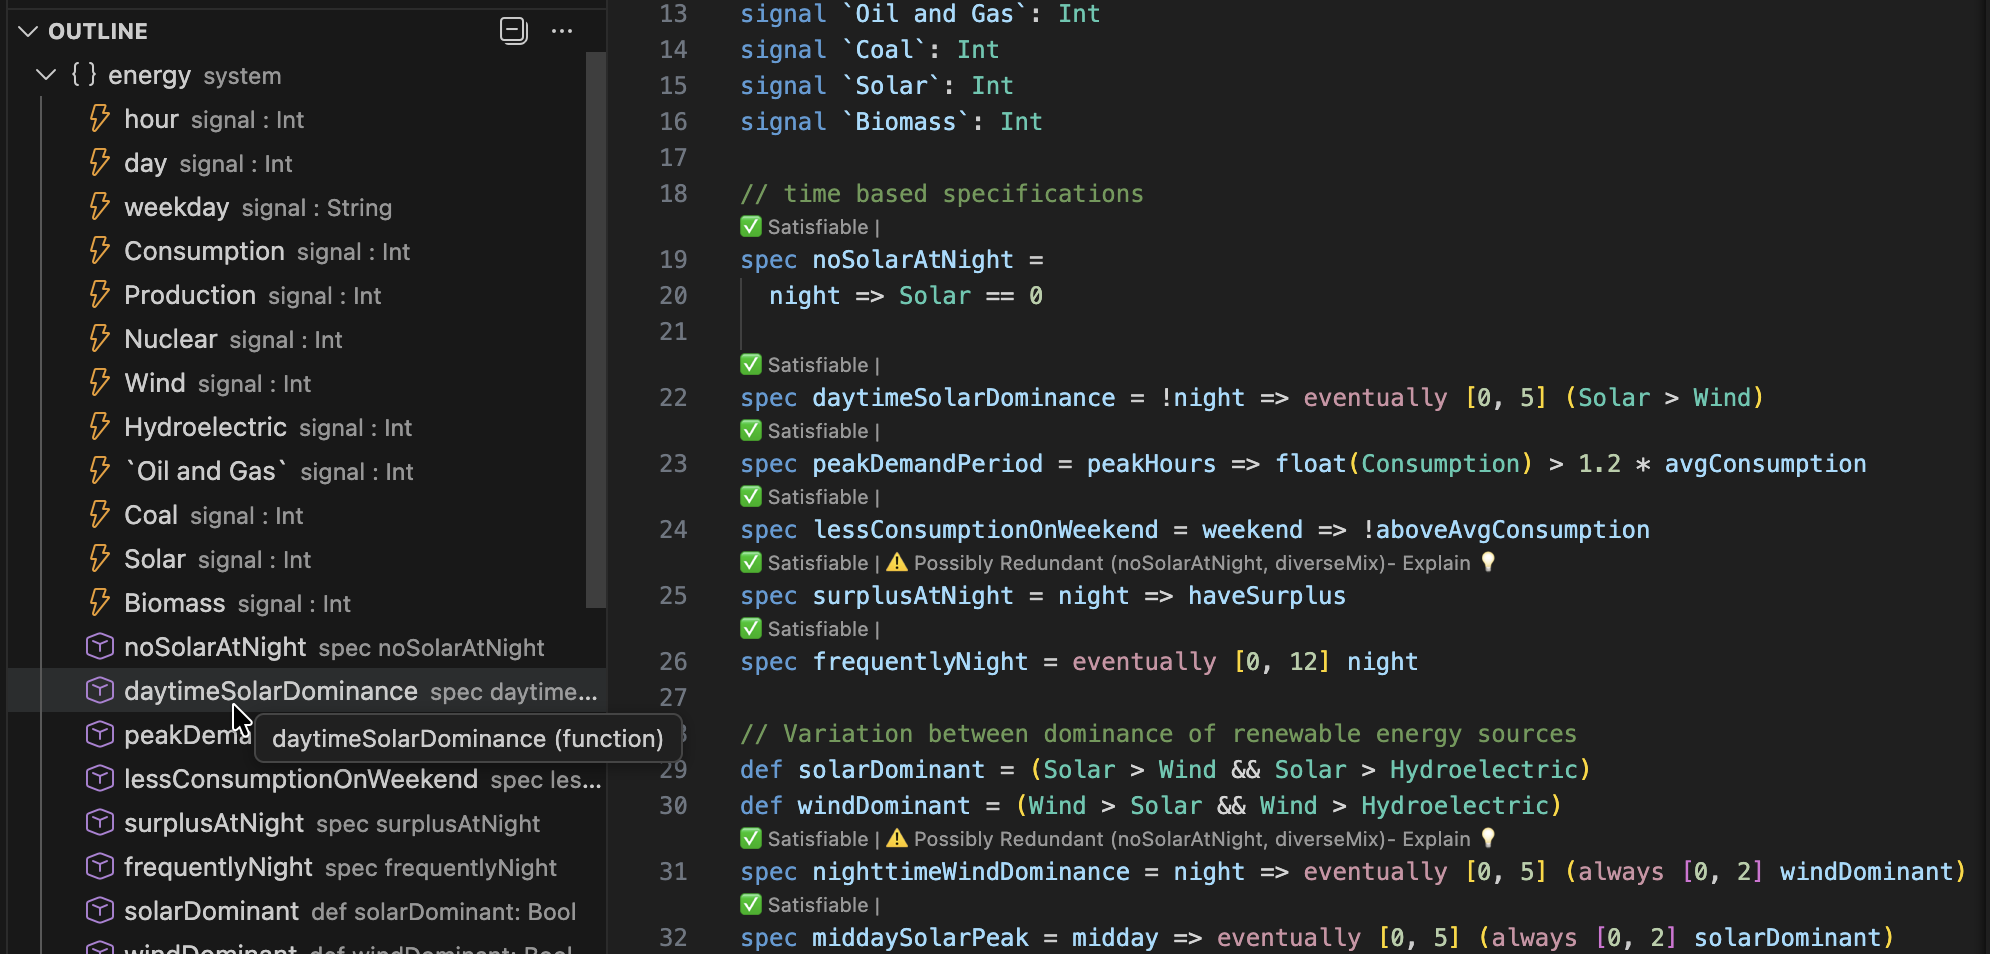
Redundancy
If the system detects that a spec might be redundant, a warning is show as a code lens:

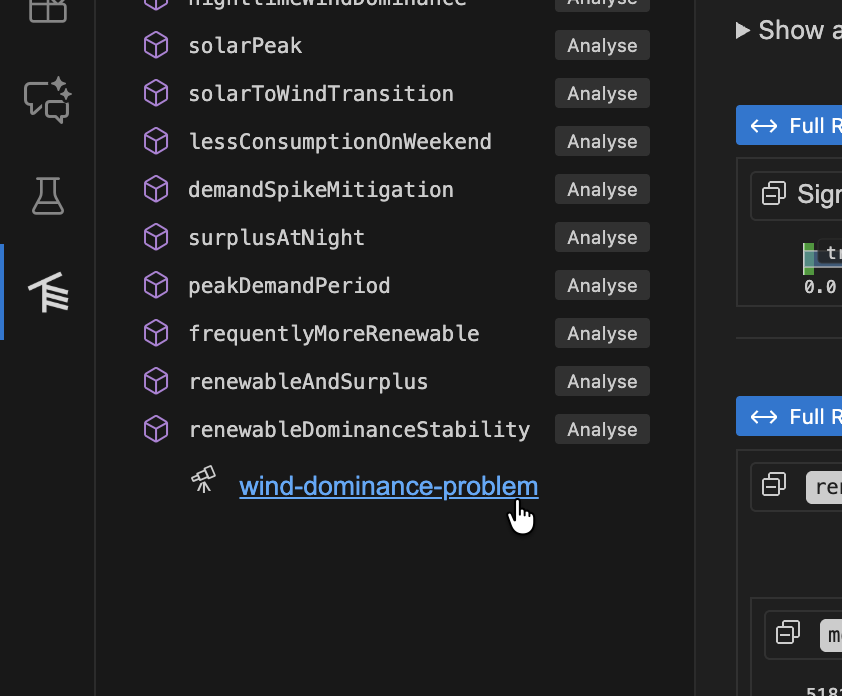
In this case, SpecForge is indicating that the spec is implied by the specifications noSolarAtNight and diverseMix, and is therefore not necessary. By clicking Explain, an explanation for the redundancy is produced:

Spec stubs
If a spec does not have a body, it is a spec stub. In this case a code lens offers to generate the specification using AI.

Clicking Generate with LLM will produce a definition for the specification, that works with the current system. If the spec is too ambiguous, or if there is some other obstacle to generation, an error message will be shown.
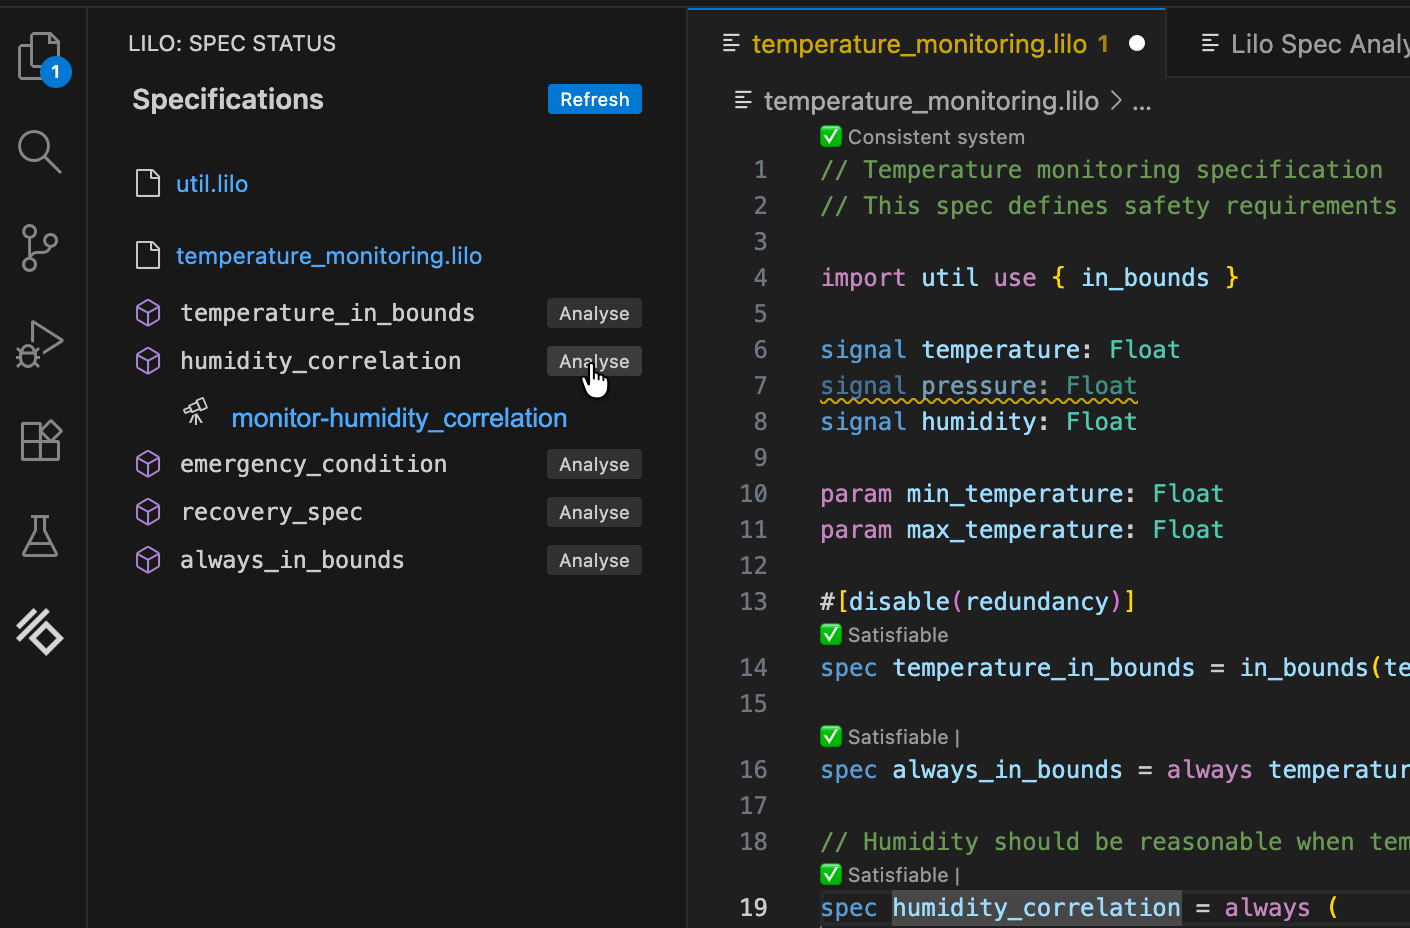
Spec Status Pane
To access the spec status panel, click the SpecForge icon on the left hand side of VSCode:
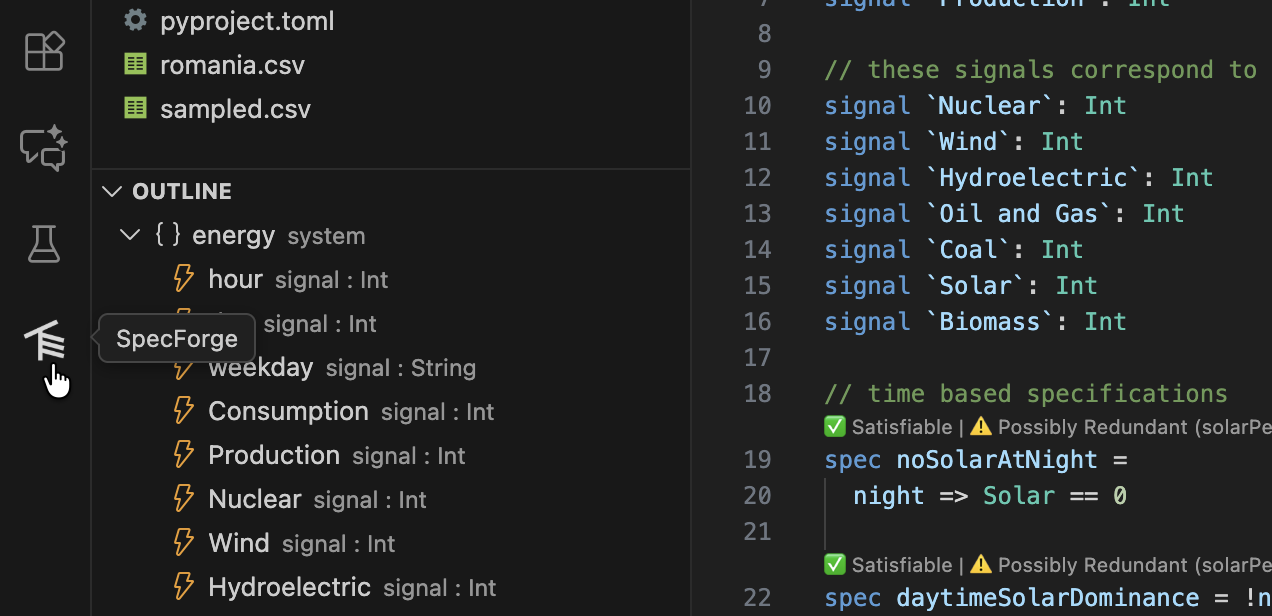
The sidebar lists all the specification files and the specs that are defined:
Clicking Analyze next to a spec will bring you to a spec analysis window. You can use this to launch various spec analysis tasks: monitoring, exemplification, export, animation and falsification.
For example, to monitor a specification, select Monitor from the dropdown, and choose a data file to monitor, and click Run Analysis.

The result of the analysis is shown. The blue areas represent the times where the specification is true. For large data files, only the boolean result is shown. To better understand why a specification is false at some point, select a point and click Drill Down.

The drill-down has chosen a small enough segment of the full data source in order to present the debugging tree. This will show a tree of monitoring result for the whole specification. Each node can be collapsed or expanded. Hovering on the timeline will also highlight relevant regions in sub-expression result timelines. Hovering on a timeline will display an explanation of why the result is true or false at that point in time, for that sub-expression.
A spec analysis such as this can be saved by clicking on the Save Analysis button.
Choose a location in your project to save the analysis.
Saved analyses will show up in the spec status side panel, underneath the relevant spec.
Analysis Types
The GUI supports five types of analysis:
1. Monitor
Check whether recorded system behavior satisfies your specification.
Inputs:
- Signal Data: CSV, JSON, or JSONL file containing time-series data
- CSV: Column headers must match signal names
- JSON/JSONL: Objects with keys matching signal names
- Parameters: JSON object with parameter values
- Options: Monitoring configuration (see Monitoring Options)
Output:
- Monitoring tree showing spec satisfaction over time
- Drill-down into sub-expressions
- Visualization of signal values
Example:
{
  "min_temperature": 10.0,
  "max_temperature": 30.0
}
2. Exemplify
Generate example traces that satisfy your specification.
Inputs:
- Number of Points: How many time time points to generate (default: 10)
- Timeout: Maximum time to spend generating (default: 5 seconds)
- Also Monitor: Whether to also show monitoring tree for the generated trace
- Assumptions: Additional constraints to satisfy (array of spec expressions)
Output:
- Generated signal data as time-series
- Optional monitoring tree if "Also Monitor" is enabled
- CSV/JSON export of generated data
Use Cases:
- Understanding what valid behavior looks like
- Testing other components with realistic data
- Creating test fixtures
- Validating your specification makes sense
3. Falsify
Search for counterexamples that violate your specification using an external model.
Prerequisites:
- A falsification script must be registered in
lilo.toml:
[[system_falsifier]]
name = "Temperature Model"
system = "temperature_control"
script = "falsifiers/temperature.py"
Falsification Script Protocol:
Your script receives these command-line arguments:
--system: The system name--spec: The specification name--options: JSON string with options--params: JSON string with parameter values--project-dir: Path to the project root
The script should:
- Simulate the system according to the specification
- Search for a trace that violates the spec
- Output JSON in the correct format with either success or failure.
Inputs:
- Falsifier: Select from configured falsifiers (dropdown)
- Timeout: Maximum time for falsification (default: 240 seconds)
- Parameters: JSON object with parameter values
Output:
- If counterexample found:
- Falsification result showing the failing trace
- Automatic monitoring of the counterexample
- Visualization of where/how the spec fails
- If no counterexample found: Success message
Make sure your script is executable:
chmod +x falsifiers/temperature.py
4. Export
Convert your specification to other formats.
Export Formats:
- Lilo: Export as
.liloformat with optional transformations - JSON: Machine-readable JSON representation
Inputs:
- Export Type: Select the target format
- Parameters: Parameter values (if needed for export)
Output:
- Exported specification in the selected format
- Can be saved to a file
Use Cases:
- Integrating with other tools
- Documentation generation
- Archiving specifications
5. Animate
Create animations showing specification behavior over time.
Inputs:
- SVG Template: Path to SVG file with placeholders
- Signal Data: CSV, JSON, or JSONL file with time-series data
Output:
- Frame-by-frame SVG images showing system evolution
- Can be combined into an animated visualization
SVG Template Format:
Your SVG template should include data-attributes for signal values, e.g.:
<svg
  xmlns="http://www.w3.org/2000/svg"
  width="100"
  height="100"
  viewBox="0 0 40 40"
  role="img"
  aria-label="Transformed ball"
>
  <rect width="100%" height="100%" fill="white" />
  <g transform="translate(0,50) scale(1,-1)">
    <circle cx="20" data-cy="temperature" cy="0" r="3" fill="black" stroke="white" />
  </g>
</svg>
In this example, the <cicle> elements cy attribute will be animated by the value of the temperature signal, thanks to the data-cy="temperature" attribute.
Monitoring Options
When running Monitor or Falsify analyses, you can configure these options:
- Time Bounds: Restrict monitoring to a specific time range
- Sampling: Adjust temporal resolution
- Signal Filtering: Monitor only specific signals
- (Additional options may be available)
Working with Results
Monitoring Tree
The monitoring tree shows:
- Root: Overall spec result (true/false/unknown)
- Sub-expressions: Drill down into why the spec is true or false
- Timeline: Hover over any expression to see when it's true/false
- Highlighting: Relevant segments are highlighted when hovering
Loading Saved Analyses
Open a saved .analysis.sf file to:
- See the original configuration
- Re-run the analysis with the same settings
- Modify parameters and run again
- Export results
The Analysis Editor provides the same interface as the main analysis GUI, but pre-populated with your saved configuration.
An analysis is a file, if you modify the analysis, you should save it.
Jupyter Notebook Integration
The extension includes a notebook renderer for displaying SpecForge results in Jupyter notebooks.
Activation
The renderer automatically activates for:
- Jupyter notebooks (
.ipynbfiles) - VSCode Interactive Python windows
Usage with Python SDK
When using the SpecForge Python SDK, results are automatically rendered:
from specforge import SpecForge

sf = SpecForge()
result = sf.monitor(
    spec_file="temperature_control.lilo",
    definition="always_in_bounds",
    data="sensor_logs.csv",
    params={"min_temperature": 10.0, "max_temperature": 30.0}
)

# result is automatically rendered in the notebook
result
Snippets
The extension provides Python code snippets for common SpecForge operations (monitor, exemplify, export). Type the snippet name and press Tab to insert and navigate through placeholders.
Troubleshooting
Extension Not Working
Check the SpecForge server:
- Ensure the server is running (see Setting up SpecForge)
- Verify the API base URL in settings matches your server
- Check the server logs for errors
Restart the language server:
- Run
SpecForge: Restart Language Serverfrom the command palette - Check the "Output" panel (View → Output) and select "SpecForge" from the dropdown
Diagnostics Not Appearing
Trigger a refresh:
- Save the file (Ctrl+S / Cmd+S)
- Close and reopen the file
- Restart the language server
Check server connection:
- Look at the status bar for connection status
- Verify the server is reachable at the configured URL
Code Lenses Not Showing
Check configuration:
- Ensure code lenses are enabled in VSCode:
Editor > Code Lens - Save the file to trigger code lens computation
Check for errors:
- Look for parse or type errors that prevent analysis
- Fix any red squiggles in your code
Analysis GUI Not Loading
Check webview:
- Open the Developer Tools:
Help > Toggle Developer Tools - Look for errors in the Console tab
- Check if the webview iframe loaded
Check server connection:
- Verify the API base URL is correct
- Test the URL in a browser (should show a JSON response)
Falsification Script Errors
Verify script setup:
- Check the script path in
lilo.toml - Ensure the script is executable:
chmod +x script.py - Test the script manually with example arguments
Check script output:
- The script must output valid JSON
- Use the correct result format (see Falsify)
- Check script logs for error messages
Common issues:
ENOENT: Script file not found (check path)EACCES: Script not executable (runchmod +x)- Parse error: Invalid JSON output (check script output format)
SpecForge Python SDK
The SpecForge python SDK is used for interacting with the SpecForge API, enabling formal specification monitoring, animation, export, and exemplification.
Refer to the Setting up the Python SDK guide for instructions on installing and configuring the SDK in a Python environment.
Quick Start
from specforge_sdk import SpecForgeClient

# Initialize client
specforge = SpecForgeClient(base_url="http://localhost:8080")

# Check API health
if specforge.health_check():
    print("✓ Connected to SpecForge API")
    print(f"API Version: {specforge.version()}")
else:
    print("✗ Cannot connect to SpecForge API")
Core Features
The SDK provides access to core SpecForge capabilities:
- Monitoring: Check specifications against data
- Animation: Create visualizations over time
- Export: Convert specifications to different formats
- Exemplification: Generate example data that satisfies specifications
Documentation
See the comprehensive demo notebook at sample-project/demo.ipynb for:
- Detailed usage examples
- Jupyter notebook integration
- Custom rendering features
API Methods
SpecForgeClient(base_url, ...)
Initialize a SpecForge API client.
Parameters:
base_url(str): The base URL of the SpecForge API server (default: "http://localhost:8080")project_dir(str/Path): Optional project directory path; if not provided, searches up from current directory forlilo.tomltimeout(int): Request timeout in seconds (default: 30)check_version(bool): Whether to check for version mismatches on initialization (default: True)
Example:
specforge = SpecForgeClient(
    base_url="http://localhost:8080",
    project_dir="/path/to/project",
    timeout=60
)
monitor(system, definition, ...)
Monitor a specification against data. Returns analysis results with verdicts and optional robustness metrics.
Key Parameters:
system(str): The system containing the definitiondefinition(str): Name of the spec to monitordata_file(str/Path): Path to data file (CSV, JSON, or JSONL)data(list/DataFrame): Direct data as list of dicts or pandas DataFrame- Note: Provide exactly one of
data_fileordata
- Note: Provide exactly one of
params_file(str/Path): Path to system parameters fileparams(dict): Direct system parameters as dictionary- Note: Provide at most one of
params_fileorparams
- Note: Provide at most one of
encoding(dict): Record encoding configurationverdicts(bool): Include verdict information (default: True)robustness(bool): Include robustness analysis (default: False)return_timeseries(bool): If True, return DataFrame; if False, display JSON (default: False)
Examples:
# Monitor with data file and params file
specforge.monitor(
    system="temperature_sensor",
    definition="always_in_bounds",
    data_file="sensor_data.csv",
    params_file="temperature_config.json"
)

# Monitor with data file and params dict
specforge.monitor(
    system="temperature_sensor",
    definition="always_in_bounds",
    data_file="sensor_data.csv",
    params={"min_temperature": 10.0, "max_temperature": 24.0}
)

# Monitor with DataFrame and get results as DataFrame
result_df = specforge.monitor(
    system="temperature_sensor",
    definition="temperature_in_bounds",
    data=synthetic_df,
    encoding=nested_encoding(),
    params={"min_temperature": 10.0, "max_temperature": 24.0},
    return_timeseries=True
)

# Monitor with robustness analysis
specforge.monitor(
    system="temperature_sensor",
    definition="temperature_in_bounds",
    data_file="sensor_data.csv",
    params={"min_temperature": 10.0, "max_temperature": 24.0},
    robustness=True
)
animate(system, svg_file, ...)
Create an animation from specification, data, and SVG template.
Key Parameters:
system(str): The system containing the animation definitionsvg_file(str/Path): Path to the SVG template filedata_file(str/Path): Path to data filedata(list/DataFrame): Direct data as list of dicts or pandas DataFrame- Note: Provide exactly one of
data_fileordata
- Note: Provide exactly one of
encoding(dict): Record encoding configurationreturn_gif(bool): If True, returns base64-encoded GIF string (default: False)save_gif(str/Path): Optional path to save the GIF file
Examples:
# Display animation frames in Jupyter
specforge.animate(
    system="temperature_sensor",
    svg_file="temp.svg",
    data_file="sensor_data.csv"
)

# Save animation as GIF file
specforge.animate(
    system="scene",
    svg_file="scene.svg",
    data_file="scene.json",
    save_gif="output.gif"
)

# Get GIF data as base64 string
gif_data = specforge.animate(
    system="temperature_sensor",
    svg_file="temp.svg",
    data=synthetic_df,
    encoding=nested_encoding(),
    return_gif=True
)
export(system, definition, ...)
Export a specification to different formats (e.g., LILO format).
Key Parameters:
system(str): The system containing the definitiondefinition(str): Name of the spec to exportexport_type(dict): Export format configuration (defaults to LILO)params_file(str/Path): Path to system parameters fileparams(dict): Direct system parameters as dictionary- Note: Provide at most one of
params_fileorparams
- Note: Provide at most one of
encoding(dict): Record encoding configurationreturn_string(bool): If True, return exported string; if False, display JSON (default: False)
Examples:
# Export to LILO format as string
lilo_result = specforge.export(
    system="temperature_sensor",
    definition="always_in_bounds",
    export_type=EXPORT_LILO,
    return_string=True
)
print(lilo_result)

# Export with params file
export_result = specforge.export(
    system="temperature_sensor",
    definition="always_in_bounds",
    export_type=EXPORT_LILO,
    params_file="temperature_config.json",
    return_string=True
)

# Export with params dict
export_result = specforge.export(
    system="temperature_sensor",
    definition="always_in_bounds",
    export_type=EXPORT_LILO,
    params={"min_temperature": 10.0, "max_temperature": 24.0},
    return_string=True
)

# Export to JSON format (display in Jupyter)
specforge.export(
    system="temperature_sensor",
    definition="humidity_correlation",
    export_type=EXPORT_JSON
)
exemplify(system, definition, ...)
Generate example data that satisfies a specification.
Key Parameters:
system(str): The system containing the definitiondefinition(str): Name of the spec to exemplifyassumptions(list): Additional assumptions to constrain generation (default: [])n_points(int): Number of data points to generate (default: 10)params_file(str/Path): Path to system parameters fileparams(dict): Direct system parameters as dictionary- Note: Provide at most one of
params_fileorparams
- Note: Provide at most one of
params_encoding(dict): Record encoding for the parameterstimeout(int): Timeout in seconds for exemplification (default: 30)also_monitor(bool): Whether to also monitor the generated data (default: False)return_timeseries(bool): If True, return DataFrame; if False, display JSON (default: False)
Examples:
# Generate an example with 20 samples
specforge.exemplify(
    system="temperature_sensor",
    definition="always_in_bounds",
    n_points=20
)

# Generate example with assumptions
humidity_assumption = {
    "expression": "eventually (humidity > 25)",
    "rigidity": "Hard"
}
specforge.exemplify(
    system="temperature_sensor",
    definition="humidity_correlation",
    assumptions=[humidity_assumption],
    n_points=20
)

# Generate example with partial params (solver fills in missing values)
specforge.exemplify(
    system="temperature_sensor",
    definition="humidity_correlation",
    assumptions=[{"expression": "always_in_bounds", "rigidity": "Hard"}],
    params={"min_temperature": 38.0},
    n_points=20
)

# Generate example and get as DataFrame
example_df = specforge.exemplify(
    system="temperature_sensor",
    definition="temperature_in_bounds",
    n_points=15,
    also_monitor=False,
    return_timeseries=True
)
health_check()
Check if the SpecForge API is available and responding.
Returns: bool - True if API is healthy, False otherwise
Example:
if specforge.health_check():
    print("✓ Connected to SpecForge API")
else:
    print("✗ Cannot connect to SpecForge API")
version()
Get the API server version and SDK version.
Returns: dict with keys "api" and "sdk"
Example:
versions = specforge.version()
print(f"API Version: {versions['api']}")
print(f"SDK Version: {versions['sdk']}")
File Format Support
- Specifications:
.lilofiles - Data:
.csv,.json,.jsonlfiles - Visualizations:
.svgfiles
Requirements
- Python 3.12+
requests>=2.25.0urllib3>=1.26.0
Temperature Sensor - SpecForge Sample Project
This is a complete example demonstrating the SpecForge Python SDK capabilities.
Files
temperature_monitoring.lilo- Sample specification for temperature monitoringsensor_data.csv- Sample sensor data (31 data points with temperature and humidity)demo.ipynb- Jupyter notebook demonstrating all SDK featurestemperature_config.json- Configuration file (parameters) for the temperature monitoring exampleutil.lilo- Utility functions for the example
Setup
Note: Hereafter, we recommend users to open
temperature_sensorfolder with VSCode.
1. Create and Activate a Virtual Environment
It is generally recommended (but not mandatory) to do this in a virtual environment. To do so, follow these instructions:
# Navigate to the sample project directory
cd temperature_sensor

# Create a virtual environment
python -m venv .venv

# Activate the virtual environment
# On Windows:
.venv\Scripts\activate
# On macOS/Linux:
source .venv/bin/activate
2. Install Dependencies
# Install the SpecForge SDK Wheel
pip install ../specforge_sdk-xxx.whl

# Install additional dependencies for the sample project
pip install jupyter pandas matplotlib numpy
3. Verify Installation
# Check that the SDK is installed correctly
python -c "from specforge_sdk import SpecForgeClient; print('✓ SDK installed successfully')"
Running the Examples
Prerequisites
- Ensure SpecForge API server is running on
http://localhost:8080/health - Activate your virtual environment (if not already active):
# On Windows:
venv\Scripts\activate
# On macOS/Linux:
source venv/bin/activate
Run the Examples
To check that the extension is working, execute the cells in demo.ipynb. The output of the monitoring commands should have a visualization.
You may need to make sure your notebook is connected to the correct Pyhton kernel. Often, it is .venv (Python3.X.X) or ipykernel. It can be configured from the VSCode notebook interface.
Sample Data Overview
The included sensor_data.csv contains:
- 31 time points (0.0 to 30.0)
- Temperature readings (20.8°C to 25.0°C)
- Humidity readings (40.9% to 51.5%)
This data is designed to test various specifications including temperature bounds, stability, and humidity correlation.
Deactivating the Environment
When you're done working with the sample project:
deactivate
Troubleshooting
Common Issues
- "Module not found" errors: Ensure the virtual environment is activated and the SDK is installed with
pip install ../specforge_sdk-xxx.whl - Connection refused: Make sure the SpecForge API server is running on
http://localhost:8080/health - Jupyter not found: Install it with
pip install jupyterin your activated virtual environment - Missing sample files: Ensure you're in the
temperature_sensordirectory
Verify Setup
# Check Python environment
which python
pip list | grep specforge

# Test API connection
python -c "from specforge_sdk import SpecForgeClient; specforge = SpecForgeClient(); print('Health check:', specforge.health_check())"
Changelog
All notable changes will be documented here. The format is based on Keep a Changelog. Lilo adheres to Semantic Versioning.
v0.5.4 - 2025-11-20
Added
- Local signal file monitoring.
- Offline licensing for Docker.
- Monitoring drill-down.
- Monitoring point of interest.
- VSCode Extension documentation.
- Public Docker image available on GHCR with accompanying docs.
- Analysis sidebar now auto-refreshes and shows a spinner while analysis runs.
Change
- Monitor tree sample limit increased to 3100.
- Spec status is no longer a preview feature.
Fixed
- Monitor tree range made responsive.
- Styles of the VSCode sidebar.
- Sample projects for monitoring are bundled correctly.
- Local signal file UX issues resolved.
v0.5.3 - 2025-11-14
Added
- A Whirlwind Tour guide.
- Offline licenses for SpecForge.
- Automated downsampling for monitoring.
- Gemini and Ollama LLM provider support.
- CLI monitoring commands gained interval and sampling options.
- Falsification examples added to the docs.
Fixed
- Issue with stale falsifier list.
- Module name mismatch error reported location.
- CLI commands now run from the project directory.
v0.5.2 - 2025-11-10
Changed
- Falsification timeout from 60 to 240 seconds.
Fixed
- Errors being reported in multiple files.
v0.5.1 - 2025-11-05
Added
- New documentation site: https://docs.imiron.io/.
- You can now create animation gif animations.
- Projects are setup with a
lilo.tomlfile, see Project Configuration. - Registration of system falsifiers in
lilo.toml. - VSCode spec status now lists analysis.
- Spec analysis in VSCode.
- Run falsification engines from the spec analysis pane.
Changed
- Better type errors for conflicting record construction/update.
- LLM explanations are localised according to user's VSCode settings.
- Unbound variable errors now include a list of in-scope variables with similar spellings.
- System globals (
signals andparams) can have attributes, including docstrings. - The command JSON format has changed significantly, as is expected to be stable (backwards compatible) going forwards. In particular this uses system names, not filenames.
- One can specify a param as
null(JSON) to remove the default param values. - LLM spec generation will fail for under-specified specifications.
- CLI interface is updated to work with modules.
v0.5.0 - 2025-10-14
Added
- Default
params:param foo: Float = 42sets42as the default value of parameterfoo. - Timeout attributes:
will set the timeout to 3 seconds for analysis tasks on spec#[timeout = 3] spec foo = ...foo. - Warning for mismatched server/client versions.
- Spec stubs:
creates a "spec stub" (an unimplemented spec). There is also a code action to suggest an implementation using the docstring, using AI.spec no_overheat - Retry analysis with longer timeout: if an analysis times out, there is a code action to retry with a longer timeout.
- Record features:
- Record update (including deep)
- Field punning.
- Path construction and path update.
- Warnings for unused
defs,signals andparams. - Code hierarchy in VSCode.
- Modules: User can create modules (containing only
defandtypedeclarations), and import them.
Changed
- VSCode code lenses resolve one at a time, which results in a much more responsive experience.